Monday, December 30, 2013

Yokohama Advan Neova AD08R

Throughout my mod journey from SP to Slowtra to Sharkie I have never come across a set of tyres so difficult to find/source. I'm not sure if the supply chain for YHI is simply screwed up or something more sinister at work. You decide. I used the AD07 previously on the SP and never had such an issue. Tyres were actually ordered in May around the time I got my Toyo R1Rs and were expected to arrive in June or July. By September the AD08Rs were still MIA. During an auto show in Auto City Juru in September I cornered a YHI SA who told me the tyres would be here around October. Gave my contact number to the SA who promised to call me when the tyres arrived. Came back with a nice brochure and an even nicer Yokohama 2013-2014 tyre catalogue.

By November I had already given up the ghost. Suddenly in December I was contacted by Tao. "Your tyres are here. You still want?" "Of course I want" was my response. These tyres are apparently top draw from what I have been reading. The AD08R is not a semi-slick version of the AD08 as what some people have been saying on the web but is succeeding and replacing the AD08.

The AD08R uses a new compound called the "MS (Micro Silica) 2R" that improves both dry and wet grip over the older "MS2" compound. MS2R has the following:
  • More carbon for improved dry grip
  • More micro silica for solid wet grip 
  • Macromolecule blended polymer to improve rigidity and resistance to wear
  • Orange oil to enhance adhesion to road surfaces. 

Is this purely marketing talk or is the AD08R really as good as what it claims to be? TireRack in the US recently did a test of the AD08R vs its competitors in the Extreme Performance Class of tyres. You can watch the video here and test results here. In summary TireRack concluded that the AD08R is one notch away from being the best at everything. Fine praise indeed!

My AD08Rs were sourced and purchased from a shop in Kulim whom I shall not call out as price wasn't competitive at RM 680 a piece. Apparently one can get these tyres in the Klang Valley well below RM 600 and I did not even do the install at the shop. Got a half decent trade-in for my still relatively new R1Rs though. With my not so good experience installing my R1Rs over on the mainland I decided to revert to the excellent hands of Goh Swee Hin on the island. This meant I had to collect the AD08Rs from Kulim and drive to Penang with the tyres in the boot and rear seats then repeat the journey with the R1Rs from the island back to Kulim. Took me half a day including the install. My tyre specs courtesy of TireRack. Sorry for the super small pic. Please click to enlarge.

Picture below of my AD08Rs at GSH waiting to be installed.  Thread pattern is the same as the previous AD08 and looks really cool in an organic spinal cord kinda way compared to the R1R which looks like Freddy Krueger just had a practice session on it. 

Label on the tyre. 

Official import from YHI. Apparently there are group buys going on over @ Lowyat. Not sure if these are official import but the prices are much lower than what I got my tyres for. Try that if you are looking for the same tyre. 

Mounted and awaiting inflation and balancing. 

Ready and awaiting to be installed on Sharkie. Cold tyre pressure was 250 kPa front and 230 kPa rear. Tyres were filled with nitrogen.

Did not have to do any alignment as I had just done the alignment bout a month back. Install + balancing cost was very reasonable for the workmanship @ RM 16 per tyre, RM 64 total. 

My drive back home was during wet conditions. Even though it was not a downpour the roads were still relatively wet but I did not notice any loss of grip. The ride quality improvement in terms of less tyre roar and a less crashy ride when going over uneven roads was evident when compared with the Toyo Proxes R1Rs. Picture below after a cleanup session. Believe it or not someone from the main YHI/Yoko distributor for Penang called me to let me know the AD08Rs were here and if I still wanted one a couple hours after I installed my tyres. Thanked and told her I already had the tyres. Apparently the YHI SA did his job.

Nice sidewall graphics but the R1R wins in this area IMHO.

All AD08Rs per my knowledge are made in Japan at this point. 

This picture tells you a lot of info including the manufacture date.

Profile on the shoulder appears even rounder than the R1R. You can compare with the R1R here

Took Sharkie for a nice blast/drive and did not notice any less dry grip compared to the R1R. Steering feedback and response is very very good. Again the lesser tyre roar when compared to the R1R is very noticeable. Like the R1Rs, the AD08Rs also has steel inserts in the sidewall but Yokohama have engineered a better ride quality (Just don't compare this with your regular everyday driving Michelins and Goodyears. This tyre is as close to a semi-slick as it gets so all my review is relative). Very balanced and progressive feel. I would also expect better tyre wear over the R1R given the better UTQG thread wear rating (180 vs 140 for the R1R). In conclusion the AD08R has similar levels of dry grip and probably wet grip too, better steering feedback and response and better NVH than the Toyo Proxes R1R but at a higher Bolehland retail price. You can also read up more decent reviews over @ Lowyat.  Further reports to follow with more use and thrashing of the AD08R in all the typical Malaysian weather conditions. Picture of Sharkie with the new shoes.

Mine's Multi Select Rear Wing for Sale - SOLD!

My Mine's Multi Select Carbon Fibre Rear Wing is for Sale! This is a genuine Mine's Japan wing and is constructed of carbon fibre which means its functional, light and strong. The wing is even lighter than the duckbill spoiler found on MYDM FL2 Slowtras. Further details can be found @ Mine's website here. You can also find the write up in my blog here (installed) and here. Wing cost me 105,750 Japanese Yen including shipping and tax. Wing is no longer in production. In today's Bolehland Ringgits this is around RM 3300.

Wing was originally meant for a Nissan Fairlady Z33 but fits any N16 sedan. Have also seen "replica" or knock-off el cheapo fibreglass or plastic only versions on Altis, Vios, Chevrolet Optra and even a Kia Forte. Unfortunately like any popular speed part there are bound to be lots of replicas and knock-offs. Also the Mine's Multi Select wing fits any BMW 3 Series E36, E46, etc. as apart from the end plates is similar to the AC Schnitzer wing for BMWs from once upon a time.

A recent picture here. Wing is adjustable for Angle of Attack. Fasteners have been replaced with stainless steel equivalents.

I am asking for RM 800 negotiable. Wing is in very very good condition having been regularly detailed with Autoglym products. End plates have also been refurbished last year with a fresh coat of clear coat. Serious enquiries only pls sms/call 012-4990807.

Stop Press! Wing has been bought by Bro Mugil

Friday, December 27, 2013

New Door Outer Mouldings

I replaced all four of my door outer mouldings. This is the boring looking black plastic/rubber piece just below your windows on the outer side of the door. Every door has one. Initially wanted to replace only two but it looked kinda mismatch due to the different shade of black between the new and old mouldings so had to replace all four. After 7.5 years, the original mouldings were looking kinda iffy with scratches and even hairline cracks all over the place. Here's how two of the well used mouldings look like. Structurally still very usable but definitely not good aesthetically. Our Malaysian sun very strong lah!

Here's pictures of the new mouldings. Didn't bother to take all four as the replacement jobs were done about a month or so apart as TCEAS does not keep ready stock so had to order. 

Looks boring till you hear the costs involved. Cost breakup is as follows: 
  • Front doors are longer so the outer moulding will cost more @ RM 99.0 per piece after discount. You need two so it's RM 198. 
  • Rears are RM88.2 per piece after discount so it's RM 176.4 total.
  • Labour charge from TCEAS was RM35 per door so total RM140
  • Total cost came up to 198 + 176.4 + 140 = RM514.4

In summary, Ouch! Nissan parts are definitely not cheap. Mouldings are made in Thailand. Took the opportunity to also clean the area of all the dirt and grime before installing the new mouldings. Picture below of front driver (right hand) side door. 

Rear left hand side. 

The end result. Difficult to take a decent picture with all the reflection. 

Part numbers:
  • Front Door Outer Moulding (LHS): 80821-8M600B
  • Front Door Outer Moulding (RHS): 80820-8M600B
  • Rear Door Outer Moulding (LHS): 82821-8M600B
  • Rear Door Outer Moulding (RHS): 82821-8M600B

Tuesday, December 24, 2013

Christmas Stocking Fillers

I know I know, it's probably too late but I've got 3 things that will make a nice Christmas and New Year present. All are brand new.

First is the latest design authentic Nismo badge. Asking for RM200 including delivery to anywhere in MY. Fits all Nissans and even Nissan wannabees if you wish. Even if you can't have parts off the latest Nismo GTR35 or even the GT500 race car you can at least have the same badge!

Next up are a set of "Samco" radiator hoses. Asking for RM120 not including shipping/courier charges. Fits all QG engines.

And lastly my original Rays Engineering Lug Nuts Long Type. Asking for RM500 not including shipping/courier charges. You can read up and see the pixs in my earlier article. If you're too lazy, it's here. Serious enquiries only pls sms/call 012-4990807.

The N16 Files would like to

Wish Everyone A Very Merry Christmas!!!

Monday, December 23, 2013

Tie-Rod End Bumpsteer Elimination Kit

One of the negative side effects from over lowering (>30mm) your Slowtra is bumpsteer. When you over lower your car the steering tie-rods start to point more and more upwards. As the tie-rods are shorter they will run in a tigher arc out of plane with the lower control arms. This causes toe-out when the wheels deflect after hitting a bump on the road causing the car to twitch and move by itself without any steering wheel input. This phenomenon is known as bumpsteer. You can read more on this in MotoIQ. To eliminate/reduce bumpsteer the tie rod has to travel on the same arc as the suspension lower arms as the car goes through travel. This can be done by adjusting the height on the tie-rod where it bolts to the wheel hub/upright as this also adjusts the tie-rod angle. The stock tie-rod ends can only be installed one way only so one would need to get something called a Tie-Rod End Bumpsteer Elimination Kit.

Diagram below illustrates the steering tie-rod and tie-rod end in red box. If you do not know where your steering tie-rod is its behind and slightly above your driveshaft. If you do not know what a driveshaft is or where your driveshaft is then I can't help you. Sorry..

Being a Slowtra owner, one can't just order this from a speed shop as there are none made for our car. Till recently the only option was to custom fabricate a kit. However I came across a vendor in US B15U forum selling such a kit and got a set when I was in the US earlier in the year and promptly purchased a set. The vendor is called TDM Imports/Kuo's Garage and they do have a number of speed parts for the N16/B15. Cost of the kit was USD 165 shipped to a location in the US. If you have it shipped to Bolehland expect to pay around a hundred ringgit or more on top of what I paid. If my info sources are correct the bumpsteer elimination kit is made by or sourced from the same manufacturer as Hardrace in Taiwan. Picture below of the materials used for the spherical bearing. A spherical bearing will eliminate any slop from the steering tie-rods resulting in a more direct steering feel.

Primary material is SCM435 chromoly steel and total weight about 1.1kg per side. Kit includes a pair of:
  • Tapered shafts 
  • End links including spherical bearings
  • Locknuts (castellated/castle/slotted type)
  • Washers
  • Spacers
  • Cotter pins (for the locknuts)
  • Decal/stickers
  • Crappy instructions (more like disclaimer/warning only)

Picture below of the kit including one assembled tie-rod end. Only available in red colour but I've also seen blue. See what I mean by crappy instructions?

The tie-rod end disassembled. Construction and quality appears to be good. 

Assembled. Apparently the N16/B15/G10's tie-rod end is same as S13-14 but I can't vouch for this as I've never compared both. Anyone that has first hand real life fact and not reading from the internet pls let me know if this is true. 

Yellow vs Red? Comparing with an equivalent Whiteline unit for the Mitsu Evo7/8/9. The Whiteline kit also comes with another component for front roll centre correction which also needs to be fixed when you over lower your Slowtra. And after fixing the front and rear roll centres, the other problem to address are the rear axles/beam going off centre and lastly the lack of suspension travel. Simply slamming your car looks cool but to get it to actually handle better than stock takes a lot of time and money. 

You can read up more including installed pictures here as I have yet to install my kit. Apart from being the king of procrastination I have not over lowered Sharkie to the point of having bumpsteer. I would also like to settle my coilover damper problem first. 

Thursday, December 19, 2013

Stripped

Those of you reading The N16 Files since the early days will (hopefully) remember I added quite a bit of sound deadening to the Shark's doors, boot lid, etc. While the sound deadening worked to a certain extent the negative side meant a lot of unwanted mass was also added to Sharkie. With ICE no longer on the agenda I have decided to remove some of the sound deadening which will also result in weight reduction and improving the power to weight ratio. Before I can get to the sound deadening I first removed the vanity carpet covering the boot/trunk lid's bottom underframe. This is held in place via twelve plastic pins. Picture below of the carpet.

Here's an old pix of the sound deadening covering the bottom of the boot lid.

To remove the sound deadening you need a lot of muscle power, BST, patience and time. Really lotsa time. Took me many hours to remove the sound deadening and to get the underside looking good. You will also need the below to scrape off the sound deadening as it adheres via a strong adhesive. You can buy the below from hardware stores like ACE and is typically used to apply wall plastering. Make sure you get a plastic one else you will end up scratching and/or damaging your boot lid.

Was told dry ice works wonders but I didn't try so can't vouch its effectiveness. Bout half or more of  the sound deadening came off relatively easily till the sections below.

In my excitement I threw the already removed pieces of sound deadening away before weighing. When I remembered I couldn't be bothered to take them from the smelly dustbin to weigh. Sorry. Anyway the remaining as per picture above came up to 443 grammes (0.44 kg) on my weighing scale.

This means the sound deadening on the boot lid alone will probably weight around 1 kg. Vanity carpet was about 0.4 kg so a total of about 1.4-1.5 kg was removed from the boot lid. The weight reduction is really noticeable when you lift up the boot lid. Below's a close up of the sticky adhesive residue left behind once the sound deadening is removed.

With all the sound deadening removed. The left corner looks pristine in the pix below coz I already cleaned it.

You will need a wax like Soft99 Meta-Clean or something like WD40 to clean off the adhesive residue. And again loads of BST, patience and time. Here's the end result. My wife asked me why not just get someone else to do it but I like my DIY and am a sucker for punishment. Blistered a finger doing this job.

There are still some slight yellow stains from where the adhesive/glue has stained the paint's clearcoat. I have tried polish and wax but the yellowness will not go away. Will probably leave it as is as the only permanent solution would be to repaint the entire underside of the boot lid.

I also decided to remove the heat/NVH insulation covering the front bonnet/hood's underframe. Picture of the insulation post removal.

Not every car has this insulation and for an N16 I believe the main purpose would be engine bay noise reduction. Like the vanity carpet underneath the rear boot lid the insulation is held in place via 12 plastic pins. The front pins are totally different from the rears with the fronts easier to remove. Just use your fingers, fondle and pull. For the rear clips you will need a Phillips screwdriver. Use the Phillips screwdriver to turn the centre pin and then slowly lift it up. Make sure the outer pin does not move along with the centre pin else you are wasting your time. Once the centre pin is partially out it should be easy to remove the entire pin assembly. I decided to weigh all 24 front and rear pins just for kicks!

The front bonnet underframe insulation weights approx 0.6 kg. Pictures below of the front bonnet's underside with the insulation removed. Very dirty as there is more than 7 years worth of accumulated grime, oil and dirt.

Here's how it looks after lots of BST cleaning.

In conclusion I have reduced Sharkie's weight by bout 2 kg or 4.4 lbs and this is probably a conservative estimate. I hope I also lost some body weight with all the hard work and exercise :) Downside would be a noticeable increase in NVH from the rear boot lid. Can't have your cherry with the icing and cake.

Saturday, December 14, 2013

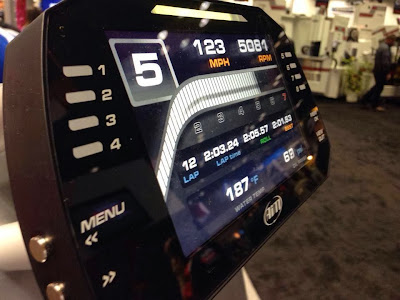
AIM MXG

Apart from "releasing" more pictures and details of the long missing in action MXL2, AIM has also just released details of the new MXG dash logger. The MXG brings AIM up to date with the latest technology display wise via a 7" high contrast 1100 lumen TFT display. Per AIM you can create as many pages as you wish, showing in different fonts and dimensions all data/info received by the MXG, as well as math channels. More details and specs in AIM's FB page. Price is estimated at around US$ 2599.00. Pictures and drawing below courtesy of AIM.
 

The availability date for the MXL2 is now February or Q1 2014 which is about 1 year later than originally promised. I don't yet have the availability date for the MXG but there should be sufficient time to start saving :)

Stop Press! AIM has just announced that the release date for MXL2 & MXG will be during the 1st Quarter of 2014. This means anytime from January to March.

Monday, November 18, 2013

Carbon Pillar Trim/Garnish

Getting any off-the-shelf carbon fibre parts specific for the N16 is next to impossible. There are some nice carbon parts for the USDM B15 including bonnet/hood, rear boot/trunk lid but these won't fit the N16 due to the different front and rear end styling Nissan uses for different markets. However I theorized carbon pillar garnish/trims for the B & C door pillars meant for the B15 should also fit the N16 which led me to a worldwide hunt... OK.. I just typed "B15 Sentra carbon pillars" on Google.

Got this from a US supplier on eBay. These have a real carbon layer unlike the fake 3M sticker stuff commonly available in Bolehland nowadays. Cost including should be between 300-340 smackers (USD 101.72) depending on the exchange rate. Picture of the nice packaging

Includes a brochure.

Opening the box revealed the following. There is an adhesive layer on the packaging which the carbon pillar trims adhere to to prevent movement and damage during shipping. Cool! But why so many pieces?

Picture below of the door pillars If you look there are already 4 sections each side not including the thin piece of plastic sectioning the rear door window but frankly I would just cover up the plastic and leave the smaller rubberized section alone.
 
Other side has a adhesive layer. Peel of the red backing tape and stick the carbon pillar garnish to your car's pillar.

Close up. Having done something similar during my SP days unfortunately this does not meet my quality standards. Seems to be only one layer of carbon cloth and too much epoxy or gel resulting in something too thick for my liking.

Also the carbon pillar garnish is slightly shorter than the pillar on the N16 by a couple mm.

I have decided not to use this and will custom make my own. Letting go for half the cost I bought this for. Anyone interested please contact me.