Monday, May 28, 2012

Oil Change Progress Part 5

Dropped by GT Auto to hand deliver some parts and as expected from the recent pictures Toby sent me most of the plumbing work is completed. Pictures below of the Slowtra.

Close up of the installed Spearco intercooler.

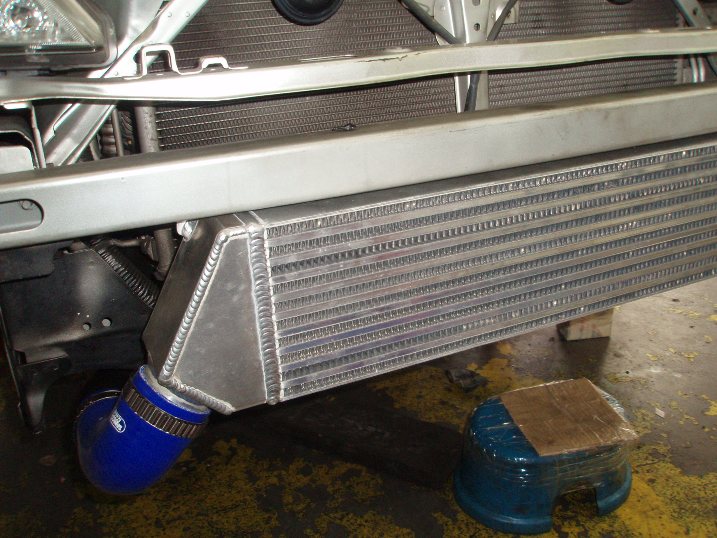
Intercooler piping left hand (passenger) side.

This is supposed to connect to the still stock throttle body but I am short of two Murray constant tension clamps which are currently stuck at Customs. Why are my friendly local Customs still interested to tax me on another couple pieces of metal? Sigh... :(
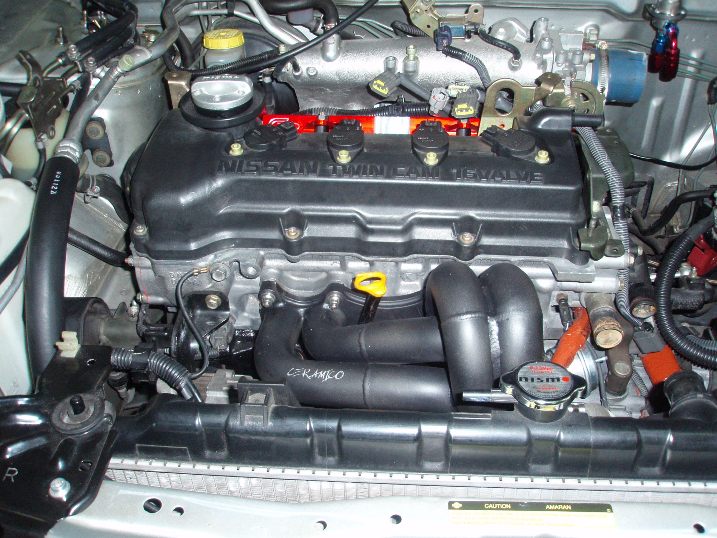
Engine bay piccies.


Stock steel bolts on cam cover replaced with Pro-Bolt black anodized aluminium alloy items. Did I tell you the stock cam cover is plastic? Damn! Wonder if Series Two (2nd Gen) QG18DE aluminium alloy cam cover fits my first gen.

Tomei FPR, etc fully fitted with AN fittings.

Am speechless! Forgot to check with Toby why the throttle body coolant piping needs to be connected. Stock is blanked off. Air filter piping connects to the stock mount brackets.

This no longer required heavy steel bracket was removed from the left hand side of the engine. The wiring harness and engine cover mounts to it but I no longer run the engine cover. There are two more heavy steel brackets for the engine cover still to be removed. I believe all three brackets will weight more than a kilo which might not be much on car weighing 1200+ kilos but every little bit counts.


Z33 350Z clutch and brake pedal pads installed. Installation involved removing the stock pedal pads with your hands and reverse the process with the Z33 pedal pads. It was as "plug and play" as you get. The accelerator "gas" pedal will most probably be from Ultimate Pedals from the US.

ECU custom wiring harness is proving a royal PITA to sort out. As expected the wiring diagrams I sourced from the US/EU/UK domestic models are quite different from the Bolehland N16. Dash also yet to be sorted out.

The engine was test fired up by Toby with Jack, Mugil and of course myself witnessing the historing event. Can still idle with the stock ECU and MAF albeit a tad lumpy with the big injectors :) Getting ever closer to the finish line...

Friday, May 18, 2012

Oil Change Progress Part 4

I was debating whether to call this update Part 3a as opposed to Part 4. It's actually only a minor update. My intercooler piping is fully connected and am really chuffed with the photo updates Toby sent me. Looks really good!

Here's the right side There are two Turbosmart Murray constant tension clamps on each side of the intercooler. Only bought 10 clamps and will need to order 4 more. All elbow/coupler/joiner hoses are silicone polymer Samco Sport in classic blue.

The left side.

In addition my Full-Race EFR BOV cover arrived. The stock EFR BOV cover is plastic whereas the Full-Race equivalent is CNC machined 6061-T6 aluminium and hard anodized black. Aluminium is definitely stronger than plastic. The Full-Race EFR BOV cover is also threaded and comes with a 90 degree barb fitting to make it easy to plumb in tight constraints. I am planning to replace this with an AN equivalent. The thread on the BOV cover is 1/8 NPT. The barb is 7/32" ID and should also be equivalent to an AN Dash 4. Pictures of the BOV cover below plus the provided 90 degree barb fitting. Top.

Bottom. Finishing and anodizing is immaculate.

Here's an old picture of my EFR 6258 showing the stock beige coloured plastic BOV cover.

Should I replace the bolts on the BOV cover with Ti equivalents?

Monday, May 14, 2012

Oil Change Progress Part 3

Was @ GT Auto over the weekend to follow up on the progress. In summary:
Picture below of the tool used to terminate the hose to an AN fitting.

Here's the engine. Apart from the manifold + snail the trick parts are all inside :) You can glimpse the Tomei FPR on the top right hand corner of the picture. Bling red custom GT Auto fuel rail probably adds 20+ hp.

The downside to using an EFR snail is the physical size. It's f*arkin big when compared to an equivalent Garrett making everything a super close fit. The close proximity to the radiator fan and air conditioning motor is going to be a real problem possibly necessitating slight relocation of the radiator further forward if possible. Every milimetre counts. Orange coloured thingy is Earl's non-asbestos flame guard insulation hose sleeving which helps insulate and protect a hose against extreme heat sources. The flame guard is capable of withstanding up to 260 degrees Celsius. I will write a separate article just on heat insulation/shielding which is critical on a turbocharged engine.

The custom fuel rail complete with GT Auto logo.

Here's the Tomei Type S FPR before being plumbed. The FPR is taking up the real estate spot where the horn used to be. Horn has been relocated downwards as can be seen from the picture. Need to source a better mount bracket. Maybe some prepreg carbon ones? Dodgy looking connector hose on the throttle body is only a temp.

FPR fuel rail feed/inlet hose and AN fitting. Hose and fitting size is AN Dash or "-" 6. The other yet to be connected fitting at the bottomof the FPR is the fuel exit. Intercooler piping temporarily fitted to ensure hose clears with sufficient length.

And here's my open pod K&N X-Stream air filter.

Another piccie.

The part number - RX-4730.

K&N X-Stream differs from your regular K&N open pod with the addition of a filter within the filter's top adding more filter area for higher airflow and a longer service interval. You can read up more on part number RX-4730 including filter dimensions on K&N's website. Picture below of the filter temporarily installed.

Final pix on the current state of things. Lots more work to be done but I hope to be running the Slowtra by July.

Tuesday, May 1, 2012

Piping Art Part 3

Piping for the intercooler is back from powder coating @ Dynatech methinks. Need to confirm. Toby choosed a black wrinkle finish for me while I originally prefered plain matt black. End result looks very good though from the pictures below. Powder coating will result in easy to maintain piping when compared to shiny polished metal that will discolour or smudge after a while.

The manifold received a black ceramic thermal dispersant coating from Ceramico. As you know a turbocharged engine produces heat. Lots and lots of heat. Improper management and dispersal of the heat will lead to heat soak issues at best and melt plastic stuff or start fires at worse. Furthermore I'm not into bawah pokok lift the bonnet on its hinge via a spacer mod. Looks ridiculous nowadays given the abundance of heat treatment coating, heat shielding and heat venting options available. You can read more on the benefits of Ceramico coatings here.  Turnaround time to get the header coated was pretty fast at a couple days. Pix of the coated turbo manifold.

Closer up.

The downpipe also received coating. The two bungs with holes are for O2 sensors (stock narrowband and wideband). I will probably only use one for the wideband as the stock will be ditched along with the stock ECU.

Silicone hose couplers and joiners will be blue Samco Sport. Final assembly should start soon.