Wednesday, April 24, 2013

New Front Windscreen and 3M Crystalline Tint

Sharkie's front windscreen has accumulated it's fair share of stone chips over the years as a result of contact with small pebbles while driving at speed especially on the Penang Bridge. Two of the stone chips were large enough to cause concern hence I finally decided to replace the windscreen. Pix below of one such chip which also caused a small crack of a couple mm. Might look like nothing now but from experience the crack will grow.

The windscreen replacement job was done @ TCEAS Bandar Perda. A brand new original Nissan front windscreen was grafted onto Sharkie after removing the old windscreen. Replacement job took bout slightly more than half a day. To allow the windscreen adhesive/sealant to fully dry do not wash the car/windscreen or drive in a heavy downpour at least 24 hours after the install. I elected not to drive Sharkie for 72 hours just to be sure given the almost daily evening showers hitting Penang recently.

Cost came up to bout RM 1123ish including install labour and top seal. Many of you will ask what about windscreen insurance? Well I did not buy any. Considering the fact the insurance is about 200++ per year and it took me 7 years to replace the windscreen we are about break even. I will definitely be insuring my new windscreen though especially with the expensive new tint. And yes, you can even insure the tint nowadays @ extra cost to the premium of course.

The tint I settled for is the 3M Crystalline having first used this on my wife's Civic. Cost came up to a massive MYR 2.5K after discount for me wife's Civic but 3M offered me a promo deal of 40% discount for the second car so Sharkie's tint was done for only 1.6K. Those of you who know me will know I use au naturale tint (i.e. NO tint for SP and Slowtra/Sharkie) so why the change now? I initially though the UV coated glass on MYDM N16 Slowtras would be sufficient but can regretfully tell you from experience that our strong MY sun will over the years damage and harden the leather upholstery and discolour the stitching without a decent tint. With the new upholstery I'm not taking any chances.

The Crystalline tint uses 3M's proprietary multi-layer technology. The working middle substrate of the film consists of over 200 vacuum deposited nano particle individual layers that block damaging UV and heat inducing IR light while letting visible light you will need to see pass through. The process used to create Crystalline was developed from 3M's aerospace division for IR (Infra-Red) sensors on satellites. This heat blocking technology means the car's air conditioning system works less resulting in improved fuel efficiency. A less taxed aircond system also means less strain on the car's cooling system which is important on a turbocharged car like Sharkie. The tint's top layer is a special scratch resistant layer while the bottom layer is an adhesive layer. The tint is non-metallic which means it will not interfere with h/phones and GPS. Your Touch 'n Go Smart Tag unfortunately will not work. 3M claims the non-metallic tint will not internally oxidise or fade purple ensuring a longer life when compared to lesser tints.

I decided to use the almost clear Crystalline 70 for the front windscreen and Crystalline 60 everywhere else. Don't want to attract unwanted attention from JPJ. The number denotes the amount of visible light transmitted through the tint or in simple English the lesser the number the darker the tint. Specs below of the various Crystalline films.

Picture below of the Crystalline tint. (70 methinks but can't really remember). Sorry.
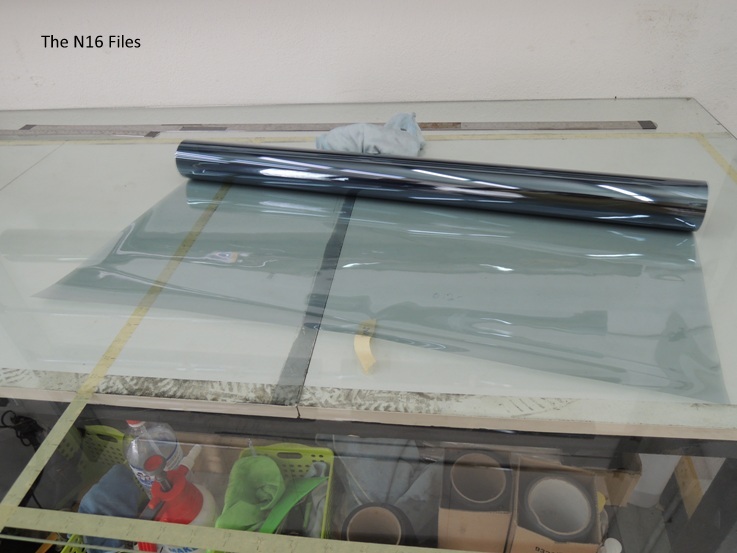
The tint was professionally installed by Shine Guard @ Auto City, Juru, Penang. Apat from Auto City, Shine Guard branches are also located at Jelutong on the island and Jalan Song Ban Kheng BM on the mainland.

The install took about 4 hours but bear in mind there was no old tint to remove from the Shark. Picture of the Shark post installation.

Shine Guard took the trouble to place these stickers on all my power window switches and also the rear demister button.

The 3M logo watermarks are everywhere to indicate you are using the original 3M tint and not a counterfeit. Beware of fakes. I am told these are in abundance. 3M issues a warranty card and serial number for every install.

The Crystalline works pretty well and cools pretty fast the moment you get into the car and drive with the aircond turned on after a hot day. Of course don't expect miracles and a cool car especially after your car is parked under a hot sun the entire day. The front windscreen tint developed a small bubble post install and the entire windscreen tint was replaced no questions asked. Excellent service!

Thursday, April 11, 2013

Leather Fetish

Had my rear seats re-trimmed in black leather with red side stitching to match the front Recaros.

The leather upholstery was done by the good guys over at DK Schweizer whom also previously did my seat leather upholstery. As usual the black is blacker cept my ancient Olympus camera had trouble resolving the actual colour. Close up pictures.

I also had the doors trimmed. 

Likewise the front centre arm rest cover.

Damage was RM 1.7K for the rear seats, door trim and front centre arm rest cover. DK was giving me excuses about the gearshift boot so I bit the bullet and ordered one in top grade Nappa leather from Redline Accessories USA. Ordered the front centre arm rest also in Nappa leather to match. Cost for the shift boot and front centre arm rest cover was USD122.82 including shipping. Picture below. 

Pictures to follow once I install. 

Monday, April 8, 2013

AIM MXL2

AIM is about to launch the all new MXL2 dash logger.

Availability is stated as early 2013 but it is now April and AIM's corporate website has still not been updated with full details and cost of the new dash. Price is not going to be cheap as this is a full dash logger with everything a track day kaki will ever need and more rather than just the dash itself. I really dig the new display and the MXL2's capability to display the track and your location but you will need to get the GPS expansion module which is sold separately. Going by how much the GPS module costs for my MXL Strada Icon expect to pay in the region of 1XXX or slightly below.

I do not know if and when AIM is planning to launch just the dash. You can read up more on the AIM MXL2 at:


Meanwhile I will start dreaming and saving.. 

Saturday, April 6, 2013

Tyre (Replacement) Time

At anything over half throttle on second gear the Shark will wheelspin at will. The ECU is tightly reigning in boost in first else first the Shark will just be limited to 4 usable gears (2nd to 5th). The problem here are my aging Dunlop SP Sport Maxx TT tyres. Remember this sat unused for more than 9 months during the build. The rubber in your tyres degrade, hardened and loses grip with age due to a process know as vulcanisation. Also please don't forget the Shark makes 3+ times more power than the Slowtra.

With this in mind I decided on Extreme Performance tyres which offer the ultimate dry road grip and holding ability but at the expense of more wear due to the softer grippier rubber compound, increased road noise and less wet weather performance. Such tyres typically combine big-block tread designs with aggressive tread compounds and reinforced internal constructions to emphasise dry road response, traction, handling and high speed capabilities for serious driving enthusiasts and are the limit to what a sane driver would use on a road for daily driving. Extreme Performance tyres are one rung up on the Max Performance tyre category which the Sport Maxx TT and other similar class tyres (e.g. Michelin Pilot Sport 3 and Goodyear Asymmetric 2) belongs. I guess so long as you don't do a touge or max speed run during Penang/Bolehland's typical torrential downpours you should be ok. I say that with experience having used the AD07 on the SP. The accelerated wear however would be a problem in regards to the $ in your pocket so can't afford a tyre that is too expensive. Most Extreme Performance tyres have a UTQG thread-wear rating between 140-180. This is much less than the 220-280 tread-wear rating of Max Performance tyres. Such tyres typically last between 15K to 25K km max. Also with me being in Penang, the options available would be a big big problem. My options would be very limited and consists of:

Bridgestone Potenza RE-11. The cost of the tyre is astronomical @ Malaysian Ringgit 1200 per piece for a 215-45 17". Yes, per piece. This means a set of 4 will cost RM 4800 for tyres lasting less than 25K km. Sorry but I don't print money. UTQG is 180 AA. The RE-11 has also been replaced by the recently launched RE-11A. I don't even want to know how much these cost.

Hankook Ventus R-S3 Z222. Not brought in by MY Hankook distributor so one would have to source from local speedshops like Pentagon Racing. Also not available in the size I want with closest being 225-45 17". To fit such a tyre would require a 10mm spacer as I am already hitting the inner wheel arch at max lock with a 215mm wide tyre. A 10mm spacer also means I would need to buy an extended lug. Since I am on a tight budget (need to la with the Shark's build exceeding my original budget two fold) these are probably my last option if nothing else is avail. Oh, and my dash will also need to be re-calibrated for 225-45 17" due to the larger rolling diameter. UTQG is 140 AA. Cost should be in the RM 600++ range assuming I can find the size I want. Flames on the thread are capable of reducing your track/drag times and increasing your top speed :)

Federal 595RS-R. I talked about this previously. Heard these are about to be replaced soon. Am apprehensive on this tyre due to the much talked thread surface crack/split problem. Google the problem if you want to find out more.

Toyo Proxes R1R. Price ranging from RM 520 to RM580+ so shop around. These tyres have been in the market for around quite some time. Thread-wear is your typical 140 AA. Interestingly the R1R tires are engineered to elevate performance in dry and wet conditions. Some people use these as track wet weather tyres. Compound is apparently super soft but these are the cheapest extreme performance tyres I can find locally.

Advan Neova AD08. This was initially my number one choice but the price has increased massively compared to the previous gen AD07. I was quoted RM800 per tyre after discount by YHI SA. Also very difficult to find locally and will need to wait 1-2 months. UTQG thread-wear is 180 AA which like the Bridgestone is what most Japs usually state for their Extreme Performance tyres. Recently found out that these are supposed to be replaced by the just launched (in early March) AD08R which is why there is no stock for the AD08.

Kumho Ecsta XS KU36. Gave up trying to find this in Penang. UTQG is competitive with its competitors at 180 AA.

Grassroots Motorsport mag did an excellent comparison review of these tyres. You can read it up more here:

I've made my decision and ordered the Toyo Proxes R1R. It's comparatively "reasonably priced" for me to be able to test and see. Stay tuned. 

Sunday, March 31, 2013

1st Service

After close to 3000km the Shark was ready for it's first service since coming home. Made a trip to GT Auto and left Sharkie there for the following 5 things to be done:
  1. Service the engine/car
  2. Remap cold start idle
  3. Check and resolve knocking sound from exhaust
  4. Stop beeping sound upon startup
  5. Replace windscreen wiper water nozzle hose with Samco
Collected Sharkie bout a week later fully serviced and ready for the drive home. The engine oil I have been using since engine run-in and will continue to use for the service is the Motul 300V Chrono 10W40.

The 300V Chrono is a 100% fully synthetic engine oil with Motul's Double-Ester Technology for racing cars with NA or turbocharged engines requiring maximum power output and faster revs while maintaining oil pressure at high rpm and high temperatures. With this oil Sharkie's engine feels very smooth and this was very evident during my drive back to Penang. The only problem is the massive cost @ RM205 for a 2 litre bottle. Sharkie requires two bottles so it's RM410 on engine oil alone every service. Filter used is original Nissan. I might try the Nismo one of these days when more money falls from the sky.

The Shark's cold start and idling issues have been sorted as mentioned previously. More driving required to see if the knocking sound from the exhaust has been permanently eliminated. I did not hear any knocks on my drive home from Penang. The knocking sound was resolved by one of Toby's exhaust job contacts as Tonnka wanted Sharkie to be sent to Malacca for the job. Too much trouble and hassle lar :(

As for the beeping sound it was caused by this.

It's the g*dd*mn immobilizer! Every time I start the Shark or turn on the ignition circuit it would go "beep beep!" for about a minute or so. I believe the immobilizer has a connection to the stock ECU but since the Shark's brain transplant the stock ECU is no longer there hence the warning beeps. "Invasion of the Body Snatchers"? Not that I care much anyway. This security device would occasionally result in the Slowtra not being able to start and me having to remove the key from the ignition key socket and shake the key a bit before reinserting and trying to start the car. A real PITA! Removing the immobilizer permanently eliminated the irritating beeps. What a relief and also saves some weight!

Picture below of the Samco 4mm silicone hose I bought from Amber Performance @ eBay as replacement for the stock rubber windscreen wiper nozzle hose.

Job looks easy NOT! Lots of stuff had to be removed to install the hose as it snakes into the front right hand side fender before attaching to the reservoir.

Was thinking of a clamp to secure the coolant overflow hose but the man can read my mind and went ahead and did it despite me not asking. Big thumps up!

I also nicked some power decals from GT Auto. The decals are worth more than 230hp! :P

Wednesday, March 27, 2013

Blood, Sweat and Tears

Greg was disassembling a brand new oil pump I had purchased when the below happened :( Hope the pix doesn't gross you out.

Words from the man himself - "As I was removing the large bolt holding the pressure valve, the grip on the assembly was tenuous at best. When it finally cracked open my hand slipped and my knuckle racked against the edge of the brand new assembly. Immediately I knew it would be bad as it began to bleed profusely. As I still had to remove some parts I wrapped it in a shop towel. Luckily, the only brand new, clean (are they ever really clean?) shop towel. Then after a minute I went into the sink to wash it and apply a band aid. It was cut open pretty nice and deep, and with an impressive jagged cut. My wife, who aspired to become a nurse, literally gave up the dream as she helped apply the bandage. It was enough that she didn't faint or puke. She insisted we go to the hospital where it was cleaned well and 3 stitches were applied. I wore a splint for 2 days to allow it to heal and not bend. Day 3 I'm good with just a bandage, and can mostly fully grip the steering wheel."

Greg joins a small number of esteemed individuals whom have shed BST on the Shark. He's the undisputed winner though when it comes to amount of "B" shed. Triple Ouch!!!

More on the oil pump project later. Happy guessing what I'm doing to it (the oil pump)...

Tuesday, March 26, 2013

Start and Idle

Making power from a fully build engine is actually the easier part. Getting the engine to behave close enough to stock on things like a stable engine idle and starting from cold so that the car is good enough for daily driving is the tougher part. Let's face it, unless your car is a full time kereta perang (track only race car) and transported to the race track on a truck all these things which we take for granted matter a lot. Nobody wants to have to start their daily driver multiple times just to get the engine running cleanly. Or having to crank the engine forever just to get it to start. Or wait in the hot sun for 5-10 minutes till the engine reaches optimum operating temps before being able to turn on the air-conditioning. That's why piggyback controllers are so popular. Let the stock ECU where thousands of man hours have been spent perfecting the idle and start to control these while the piggyback controls only the fuel and for some the ignition timing.

However piggyback controllers are mostly limited by what your stock ECU can achieve and was never going to cut it on an engine build to make three and more times the power than stock and with equivalent larger capacity fuel injectors and fuel pump. With popular cars like the Mitsubishi Evo, there are lots of players and the body of knowledge is immense in the market so finding a suitable map is much easier with many people sharing their data. With the Shark nobody has yet fitted a fully programmable ECU and mapped the QG engine so we are essentially starting from point zero. This is where the skill of the tuner installing and mapping ECU is very important and IMHO in Bolehland and South East Asia, Toby Lee can be considered one of the best. Having a decent ECU like the Autronic SM4 helps too :)

The Shark initially had perfect manners when I first collected it but after close to 3000km of run-in the engine had developed some quirks. Quirks include occasionally having to start the engine 3-5 times before it could idle especially when cold. Upon start up the revs would go up but the engine would stall once the revs dropped. The idle would also occasionally hunt a bit especially on hot days. Toby has managed to eliminate most of the quirkiness with a recent remap when the Shark visited GT Auto recently. I'll let the following two videos do the talking. Enjoy..

Start and Idle 1

Start and Idle 2 - When engine is really cold

Sunday, March 24, 2013

Dyno Run Video

Some of you have been asking me how Sharkie sounds like. Well, here's a very recent dyno run when I visited GT Auto to service the Shark and tidy up the start and idle mapping (more on that later). What is most impressive is the Shark had just done a 330+ km trip from Penang to GT Auto just before the dyno run. It was literally drive from Penang down south, stopping @ Tapah for a bio break, Sungai Buloh for lunch and then straight to Bandar Sunway and GT Auto traffic jam and all. Oh, and eat a few pesky cars for brunch till the speed limiter (sorry wife) kicked in.

The Shark getting prep for the dyno run.

The video of run #2. Power's down due to heat soak and a bloody hot day. Even then it's 295hp at the wheels. Remember to switch resolution to 720p. Video courtesy of Bro Peter.

Run #3 was a tad down from run #2 netting ~293whp so we decided to call it a day.

Friday, March 8, 2013

Whiteline Front Anti-Roll/Sway Bar Link Kit

I am currently in process of upgrading the the entire front lower arm, subframe and anti-roll bar assembly for the Shark which have seen better days in the more than 95 thousand km travelled. First part to arrive is the Whiteline Front Anti-Roll/Sway Bar Link Kit, part number W23188. Interestingly Whiteline quotes the same part number from Nissan N13 to N16 and also the Mitsubishi Galant HG, HH VR4 AWD. The part was ordered from Whiteline's wholesale distributor in Singapore & Malaysia - SP Line Trading. The contact for SP Line Trading is Simon Oh. You can get the full contact for Simon and other dealers from Whiteline's website. Simon was very responsive on my emails and with good follow up till delivery. Unfortunately he got my addresse a tad wrong for the delivery. "Lorong" became "Jalan". Luckily the courier had my contact number and I resolved the address slip and took delivery after bout a week later than expected. No big issue.

Picture of the anti-roll bar (ARB) link kit/assembly in its packaging. Cost me bout 350 moolahs including courier delivery cost.

Contents of the packaging. My first expression was OhmyGawd! Bling red coloured ball joints! Luckily this was only the plastic cover for the ball joints which need to be removed before assembly. Nice piece of quality from Whiteline.

Close up of the components of one side of the arb link.

This is what the the link is and where it goes in the whole scheme of the front suspension if you have no idea what I am referring to. Drawing is from a USDM Nissan Sentra B15 technical service manual.

The link assembly is exactly the same as stock except the use of better materials for the bushes/joints. A ball joint with rubber cap/seal is used for the anti-roll bar end while the end that bolts to the front lower arm makes do with Synthetic Elastomer bushes which are much stiffer than the stock mushy rubber ones yet allowing for the correct articulation of movement required from the front anti-roll bar without binding. Thank you Whiteline for specifying black coloured bushes which are much better aesthetically (to my eyes) than the yellow bushes Whiteline typically uses for its arb kits. This should definitely improve and quicken the feel/action of the front anti-roll bar.

Can't wait to install the Whiteline Front Anti-Roll/Sway Bar Link Kit. Need to grow some more money trees though as I also need to get a pair of new front lower arms first. Also even more money for the Superpro bushes to go with the arms. Then there's also delrin or aluminium bushes for the front crossmember. And maybe PU bushes for the front arb mounts. It's a bottomless pit...

Stop Press: Simon whatsapped me to follow up on the delivery of the arb link kit and gave me some juicy info:
  1. Whiteline and Superpro are competitors. This means Whiteline bushes are not going to be made by Superpro and neither are they the same material.
  2. Whiteline uses a material called Synthetic Elastomer for it's bushes and not polyurethane (PU). Whiteline details the advantages of Synthetic Elastomer versus PU on it's website. Major advantage apparently is less/no noise/squeak and less/no greasing required. Guess this answers my own doubt on why white lithium grease in a sachet is not supplied with the bushes as per norm. Cause the bushes are not PU! Technology has moved on and I need to do more reading...

Sunday, March 3, 2013

Engine - Latest Spec

Here's the latest glam shot of the Shark's engine bay.

What is in the picture above engine wise as of today and as far as I can remember:
  • Ross custom forged pistons 
  • K1 Technologies custom H-beam connecting rods with ARP 2000 rod bolts
  • ARP 2000 head bolts 
  • ARP 8740 chromoly main bolts 
  • Ajusa MLS head gasket
  • GT Auto custom fuel rail with AN-6 fuel lines 
  • Deatschwerks 600cc fuel injectors 
  • Turbosmart FPR-800 fuel pressure regulator with mechanical fuel gauge
  • GT Auto custom oil catch tank modified for AN-8 fittings and lines 
  • Denso Iridium Power spark plugs 
  • Nissan latest generation ignition coils 
  • Tonnka full stainless custom turbo manifold and downpipe with Ceramico thermal dispersant coating
  • ARP 300 series stainless steel stud kit for exhaust/turbo manifold
  • Borg Warner EFR6258 turbine 
  • Full-Race Motorsports EFR BOV cover
  • GCG Downpipe full stainless V-Band Flange 
  • Design Engineering (DEI) Titanium Turbo Shield turbo blanket
  • Tonnka full stainless turbo inlet piping 
  • Turbosmart Murray Constant Tension Clamps (2.500"-3.375")
  • Earl's non-asbestos flame guard insulation hose sleeving 
  • Turbonetics Spearco intercooler
  • Sikky Manufacturing Thermalnator high temperature shielding gasket for inlet manifold
  • K&N X-Stream open pod air filter
  • Mishimoto 36mm dual core aluminium radiator 
  • 12" SPAL radiator and aircond fans 
  • Samco silicone radiator and turbo piping hoses 
  • Nismo radiator cap
  • Nismo oil filler cap
  • KICS Project magnetic drain bolt
  • AEM Water/Methanol Injection Kit with filter.
  • Autronic SM4 ECU running on MAP for airflow sensor with stock mass airflow sensor deleted
  • Innovate Motorsports LC-1 wideband air fuel ratio sensor/controller 

With the engine more or less sorted the focus will now be more towards the suspension, chassis and removing flab. All the power is useless if you can't get the car to handle. 

Tuesday, February 19, 2013

Nismo Racing Radiator Cap Revisited

The bling Cosworth radiator cap I got is leaking with my Mishimoto radiator :( There was no leak with my 5+ year old well used Nismo radiator cap. I can confirm this with extensive testing. Excellent quality and durability for the Nismo but so much for the famed Cosworth quality. Anybody interested to further test the Cosworth radiator cap can contact me. Anybody interested in my old Nismo radiator cap can also contact me. I can guarantee it (the Nismo radiator cap) still has at least a couple more years of useful service life.

I ordered a new Nismo radiator cap from RHD Japan which arrived in less than a week. Picture below of me radiator cap installed. Unfortunately the "Nismo" logo and warning text on the radiator cap label do not appear horizontally aligned with the Mishi radiator. WTF! Same problem with the Cosworth. There is no alignment issue when the Mishi radiator cap is used.

You can read up on Nismo radiator cap details in my old post here.

Sunday, February 17, 2013

Dietary Supplements Part 5 - Not All Titanium Fasteners are the Same

On the left is a M8 flange nut from Pro-Bolt. On the right an equivalent from Hyperbolt.

To my eyes the Pro-Bolt flange nut looks lighter while the Hyperbolt is beefier and cheaper. Is the Pro-Bolt engineered to be lighter or as Bro Mugil puts it "plain cost cutting"? Any comments/thoughts?

Anyway I went with a titanium full nut + washer for the fuel rail. Unfortunately there is no ti spring washer in the size I want.

"New" Ignition Coils

The ignition coils I've been using while looking dog worn have worked well and lasted me more than 800 km so I have been on the lookout for better condition replacements which me engineer in Penang, Tao managed to source for me. Tao was recommended by Toby and does excellent work. He helped me troubleshoot and isolate my oil pressure sensor failure. Having a good technician/engineer in Penang is critical with Toby @ GT Auto being so far away. Tao even does mapping work and is familiar with Haltechs.

Picture below of the superb condition latest spec used ignition coils. A brand new set will cost you bout 1K not including shipping direct from the US and more than that from Sushiland. This set cost me less than half the cost of a new US set and looked as good as new after cleaning.

The latest spec part number is 22448-6N015 as mentioned previously.

Fondling sorry installation took less than 20 minutes including cleaning the cam cover ignition coil valley. Picture below of the ignition coils installed together with some black anodized Pro-Bolt aluminium fasteners.

Close up.

The "new" coils are working fine though I am still experiencing some ignition breakup at high boost/high revs. Toby has promised me some development work with CDI ignition coils after the new year :)

Friday, February 8, 2013

Quaife ATB LSD Now Available for 32A and 70A Gearboxes

Thanks to some blokes Down Under Quaife now has a ATB (Automatic Torque Biasing) helical gear LSD for the RS5F32A series gearboxes. And as you know a LSD for that gearbox also fits the RS5F70A. The LSD is so new its no yet up on Quaife's website but the listing is available in Quaife's 2013 catalogue. You can download the catalogue here. Part number is QDF17L (Nissan Almera/Primera).

The N16 Files would like to

Wish Everyone a Very Happy and Prosperous Chinese New Year!!!

May the year of the snake bring you health, wealth and of course oil change, horsepower and track records! :)

Saturday, February 2, 2013

Different Shades of Black - UR Room/ B-Pillar Floor Bar Revisited

The UR Room Bar on the Shark had been accumulating its fair share of scratches and scrapes after 1.5 years in use  hence I recently got it repainted.  The room bar was repainted matte black via a different painter hence the different shade. I prefer the newer shade as it looks more matte to my eyes. The re-install position of the room bar was also deemed to add more rigidity compared to the previous install. The carpet had to be trimmed though for the new install.

Original install

Latest re-install.

Picture of the room bar reinstalled.

My rear seats need to be black to complete the new look :)

Saturday, January 19, 2013

Thermal Management Part 2: SPAL Fans

The stock fans do a decent job on a stock engine. They can even do a nearly decent job on a turbocharged engine. The biggest problem apart from the lack of blowing power is the amount of real estate space they occupy especially with a thicker radiator in place of the stock puny 16mm single core radiator. Couple that with the physically large (larger than an equivalent Garrett) BorgWarner EFR 6258 and the lack of space becomes a nightmare especially the proximity of the mostly plastic fan to the hot side of the turbine. Picture below shows the space (lack of) with my Mishimoto radiator and the stock fans fitted.

With the radiator pushed forward as much as possible. Too say I was worried would be an understatement.

It got to the point where I was actually thinking of blowing yet more of my fast depleting budget and have a custom radiator designed and made by the likes of PWR that would be thicker than the stock puny 16mm single core radiator but thinner than my Mishimoto's 36mm double core. A lot of ado and money for nothing :(

Luckily Toby came to the rescue and fitted a pair of SPAL fans. GT Auto has recently become a dealer for SPAL, an Italian manufacturer of automotive cooling fans. SPAL makes a wide range of fans and caters for both the OEM and aftermarket. SPAL has been designing and producing automotive cooling fans and centrifugal blowers since 1959 hence with more than 50 years of experience their products are quality and leading edge. Picture below of my fans. Both fans are still of the original puller type as per stock and have a diameter of 12" or 305mm. Each fan is individually balanced for long life. Motors and electrical connectors are waterproof.


The fan on the left in the picture above (nearer to the alternator) has a smaller motor and comes from SPAL's Medium Profile range. Part number is VA10-AP50. Fan weighs bout 1.5 kg and is capable of flowing 1097 CFM.


The fan with the larger deeper motor comes from SPAL's High Performance range and is capable of flowing double the VA10-AP50 or 2190 CFM. Part number is VA10-AP70. This fan serves as the primary cooling fan. Weight is approximately 2.33kg.

The big badass fan motor.

Curved aerodynamically designed fan blades for reduced noise and increased airflow.

Much more clearance and this is with the radiator back to stock position.

The SPAL fans really work a treat. Both are activated by the ECU and every time the fans activate, temps come down approx 3-5 degrees as indicated by my AIM dash. However even with the SPAL fans and Mishimoto radiator there are still cooling performance gains to be made. For one thing need to seal the big gap between the radiator and radiator top support beam. A fan shroud like the Mishimoto fan shroud kit with me SPAL fans in place of the crappy Mishi ones would also be nice but more fabrication work. The idea here is to force as much air as possible to travel through the radiator.

And.... as promised from Part 1, here's a pic of my Sikky Manufacturing Thermalnator high temperature shielding gasket installed. It's the orangey (looks pinkish in the picture) thing between the cylinder head and the inlet manifold.