Ordered my Nismo Veruspeed oil filter from RHD Japan. Price quoted by RHD Japan is 1,995 Japanese Yen. You will need to add shipping on top of that. Pos Laju never sent me any notice to go collect when the oil filter arrived. Luckily I was able to track the shipment on the web and called Pos Laju to arrange for pick up. Malaysia Boleh service :(
Picture below shows the actual oil filter box vs the shipping packaging. Major waste of packaging and my money (on the shipping) if you asked me.
There are 2 models of Veruspeed listed by Nismo. Get this one for QG engines. All QGs use the same oil filter. The other model is larger (longer) and typically used by Nissan factory turbocharged engines/models.
Why the Veruspeed oil filter? Well, Nismo claims that the large filter area (3 level filtration) decreases pressure loss and improves filter efficiency over an extended life-span. This stabilises oil pressure and stops dirt and sludge from getting into the engine. The Veruspeed oil filter uses a "Inclined Density Structure" filter element structure in which the filter weave becomes denser towards the centre. Larger particles are caught near the surface while finer particles are trapped in the fine mesh near the core. The action prevents clogging. More details and pictures on Nismo's website. Make sure you can view Acrobat pdf files.
Picture below of my Nismo Veruspeed oil filter.
Filter will go in during Sharkie's next service together with the WPC oil pump. Will know then if there is a real pressure increase or I have spent a big wad of my hard earned money for nothing.
Saturday, June 15, 2013
Tuesday, June 4, 2013
Front Lower Control Arms with Whiteline Bushes Installed
Tao got the me brand new original Nissan front lower control arms as requested. The arms are RM420 per piece (RM840 a pair). He also got the stock bushes removed and the Whiteline bushes pressed into the new arms. Took a bit of research and coordination work with the machine shop to ensure correct orientation of the bushes as Whiteline did not supply any install instructions with the bushes nor was there any instruction on their website. Simon was very helpful and provided me this drawing.
Picture below of my front lower control arms with Whiteline goodies. The Whiteline bushes and the arb link kit combined cost more than the arms.
The entire install job was done @ my house front porch DIY style with Tao and myself supplying the bst. Picture below of Sharkie trying to eat Tao for lunch. Bad Girl!
Tao also trimmed the arm end where the ball joint resides to clear my brake rotors and repainted the trimmed end of the arm. This part bolts to your front hub and knuckle. The ball joints height determines the N16's front roll centre geometry.
Picture of the Whiteline inner rear bush on the left hand side front lower control arm. You can see the offset internal hole for additional positive caster. Positive caster helps stability by causing the tyre to lean into turns when the wheel is turned improving traction. The L shaped thingy in the background top centre is my assembled Whiteline front arb link.
The install job took a tad less than 3 hours but could have been much less had Tao not forget to bring along a spanner which meant he had to go home to fetch the MIA spanner and then back to my house again. While waiting for Tao I decided to do some tender loving care with a can of WD40. Picture below of my for sale BC Racing BR shocks after a bit of cleaning. Excellent condition eh? So what are you waiting for? :) "62 200 07" means 62mm diameter coil spring, 200mm height and 7kg/mm spring rate.
Picture below of both my stock seven year old front lower control arms post removal from Sharkie.
The triangular piece of metal plate in the picture above is the rebound stopper which attaches to the front subframe. There is one on each side of the car. Bro Peter got me a pair brand new ones from the US via Greg @ GSpec. There are no bushes on the rebound stopper and that bush looking thingy on the stopper is actually a piece of my anti-rust coating that decided "it" loved the rebound stopper more than Sharkie hence decided to part ways with Sharkie. Bummer!
Picture below of the brand new RHS stopper. Thanks Bro!
My puny looking (when compared to the Whiteline equivalent) 7 year old front arb links. Rubber on the bushes have hardened and a tad out of shape but otherwise still perfectly functional.
Took Sharkie for a drive after the install and immediately the effect from the Whiteline bushes were noticeable. The car felt more compliant @ yet reactive to sudden steering speed and one can feel more of the suspension doing it's job. The ride was less crashy and actually more comfortable at speed. Drive slow-mo and the very slightly firmer ride from the Whiteline bushes are noticeable but really no biggie deal to me. Got the alignment dialed in the following day over at Goh Swee Hin. Sharkie's alignment post lower arm install and before the alignment job. Look at the lack of (negative) camber! Dayum!
Picture below of my alignment report printout after some work.
The GSH alignment tech tells me the camber is as much as I can get without more extensive work or resorting to failure prone camber bolts :( The tech also asked me if I can adjust camber via my shock top mount since I am on pillowball top mounts so I showed him the small tight hole on top of the front suspension turret :( Here's an alignment report comparison from 2 years ago when Sharkie was Slowtra. I feel there's more negative camber to be had with the slotted bolt holes in the lower mount bracket of my BC Racing BR coilover shocks but it is a lot of work. Need to find an alignment shop willing to do the work. Tao tells me there is a shop but it is in Kulim. Sigh..
I also took the opportunity to fill Sharkie's tyres with nitrogen. Yes I know, our atmosphere is approximately 78% nitrogen but it's the remaining 22% of oxygen and other crap I am concerned about. Cost me RM 5 to inflate a tyre with nitrogen so its RM 20 total for four tyres. Picture below of the machine used to inflate tyres with 100% nitrogen.
The benefits of nitrogen are stated on the machine itself.
So far no squeaks from the bushes but its very early days. Time will tell.
Picture below of my front lower control arms with Whiteline goodies. The Whiteline bushes and the arb link kit combined cost more than the arms.
The entire install job was done @ my house front porch DIY style with Tao and myself supplying the bst. Picture below of Sharkie trying to eat Tao for lunch. Bad Girl!
Tao also trimmed the arm end where the ball joint resides to clear my brake rotors and repainted the trimmed end of the arm. This part bolts to your front hub and knuckle. The ball joints height determines the N16's front roll centre geometry.
Picture of the Whiteline inner rear bush on the left hand side front lower control arm. You can see the offset internal hole for additional positive caster. Positive caster helps stability by causing the tyre to lean into turns when the wheel is turned improving traction. The L shaped thingy in the background top centre is my assembled Whiteline front arb link.
The install job took a tad less than 3 hours but could have been much less had Tao not forget to bring along a spanner which meant he had to go home to fetch the MIA spanner and then back to my house again. While waiting for Tao I decided to do some tender loving care with a can of WD40. Picture below of my for sale BC Racing BR shocks after a bit of cleaning. Excellent condition eh? So what are you waiting for? :) "62 200 07" means 62mm diameter coil spring, 200mm height and 7kg/mm spring rate.
Picture below of both my stock seven year old front lower control arms post removal from Sharkie.
The triangular piece of metal plate in the picture above is the rebound stopper which attaches to the front subframe. There is one on each side of the car. Bro Peter got me a pair brand new ones from the US via Greg @ GSpec. There are no bushes on the rebound stopper and that bush looking thingy on the stopper is actually a piece of my anti-rust coating that decided "it" loved the rebound stopper more than Sharkie hence decided to part ways with Sharkie. Bummer!
Picture below of the brand new RHS stopper. Thanks Bro!
My puny looking (when compared to the Whiteline equivalent) 7 year old front arb links. Rubber on the bushes have hardened and a tad out of shape but otherwise still perfectly functional.
Took Sharkie for a drive after the install and immediately the effect from the Whiteline bushes were noticeable. The car felt more compliant @ yet reactive to sudden steering speed and one can feel more of the suspension doing it's job. The ride was less crashy and actually more comfortable at speed. Drive slow-mo and the very slightly firmer ride from the Whiteline bushes are noticeable but really no biggie deal to me. Got the alignment dialed in the following day over at Goh Swee Hin. Sharkie's alignment post lower arm install and before the alignment job. Look at the lack of (negative) camber! Dayum!
Picture below of my alignment report printout after some work.
The GSH alignment tech tells me the camber is as much as I can get without more extensive work or resorting to failure prone camber bolts :( The tech also asked me if I can adjust camber via my shock top mount since I am on pillowball top mounts so I showed him the small tight hole on top of the front suspension turret :( Here's an alignment report comparison from 2 years ago when Sharkie was Slowtra. I feel there's more negative camber to be had with the slotted bolt holes in the lower mount bracket of my BC Racing BR coilover shocks but it is a lot of work. Need to find an alignment shop willing to do the work. Tao tells me there is a shop but it is in Kulim. Sigh..
I also took the opportunity to fill Sharkie's tyres with nitrogen. Yes I know, our atmosphere is approximately 78% nitrogen but it's the remaining 22% of oxygen and other crap I am concerned about. Cost me RM 5 to inflate a tyre with nitrogen so its RM 20 total for four tyres. Picture below of the machine used to inflate tyres with 100% nitrogen.
The benefits of nitrogen are stated on the machine itself.
So far no squeaks from the bushes but its very early days. Time will tell.
Wednesday, May 22, 2013
My BC Racing BR Coilover Shocks are for Sale (RESERVED)
Having enjoyed my BC Racing BR Series coilovers so much I am probably upgrading to the top spec ER series. This means my BRs are for sale. To recap my BRs are "RH" spec which means the top mounts are lightweight aluminium alloy with Japan spec spherical bearings. If you are worried about the noise you can use back your stock rubber mounts. To recap the specs:
- Monotube, 46mm piston in a 53mm damper body
- Front lower strut mounts are heavy duty powder coated carbon steel while rears are aluminium alloy for lightweight.
- 30 way damping adjustable (compression and rebound damping combined). Want a comfy every day ride or really stiffen things up for track day. No problem, just adjust the damping to your liking.
- Independent ride height adjustable. You can go super duper low like the Stance Nation or VIP guys without compromising the suspension travel and performance of the shock.
- Each BR shock is individually dyno tested and matched. Slotted bolt holes in the lower mount bracket for the front struts. This gives the option for an extra quarter or half degree of camber to be dialled in.
- My front spring rate is 7kg/mm and rears are 5 kg/mm. These are plenty comfy to me and likewise my wife has no complains about the ride quality having sat in my car long distance (multiple trips to and back from Penang to KL). Your butt can't be softer than hers.
The shocks were bought back in late 2011 but Sharkie sat unused for 9 months last year pending the oil change job. This means the BRs have only been used for about 10k km maybe slightly more. There are many tens of thousands of kilometres worth of life left in them. Besides, these coilover dampers are rebuildable so no need to throw away when the seals are worn.
Don't ask me how these shocks compare with the Nismo S-Tune, Titans,and other Boleh made shocks performance wise. There is NO comparison. These shocks are fully track day capable and will more than hold their own against the Tein Superstreet or Flex. Even Honda/Acura NSX owners have fitted the same shocks to their cars and have excellent feedback and review. You can read more here.
More details and extensive pictures of my BRs can be found @:
- http://www.then16files.com/2011/07/getting-busy-with-bc-racing-br-series.html
- http://www.then16files.com/2011/09/bc-racing-br-series-coilover-suspension.htm
I am asking RM 1.6K for my BRs. The manual, C spanners to adjust the ride height, etc are all available. A brand new set will cost approximately RM3.6K. This is just about enough to buy you a new sale promo price Nismo S-Tune which the BC Racing BR will eat for lunch, breakfast and dinner with room to spare for tea, supper and snacks in between. Serious enquiries please contact me via email (LLSaw1@yahoo.com) or call 012-4990807. Per norm, please do me and yourself a favour by not contacting me offering some ridiculously low best price.
And lastly the shocks are still on Sharkie and will only be available mid-July. Need some time for my new shocks to get manufactured :)
Stop Press! The BC BRs have been Reserved. Thanks for all the interest.
Wednesday, May 15, 2013
Whiteline Front Lower Arm Bushes
Second part to arrive for my front lower arm upgrade are the Whiteline bushes. The N16/B15/G10 uses two different sets of bushes for the front lower arm. These are called the lower inner front and lower inner rear bushing. Whiteline specifies two types of lower inner rear bushes - the standard and one which gives increase positive caster (+0.5 degrees) in the suspension geometry. Positive caster helps stability by causing the tyre to lean into turns when the wheel is turned increasing traction. Part number for the Whiteline inner front bush is W52148 while the increased positive caster inner rear bush is W53427. The standard inner rear bush is W53430. Like my Whiteline front ARB link kit, the bushes were supplied by Simon Oh from SP Line Trading. Simon got my address spot on this time ;) Cost came up to slightly more than 650 moolahs. Simon tells me the bushes are 75 shore in regards to the durometer or hardness of the bush. This is probably >more than a 100% increase when compared to stock.
Picture below of me bushes still in its packaging. The bushes are made from Whiteline's proprietary Synthetic Elastomer material.
The inner front bush. Whiteline supplies whatever is necessary for the bush to be installed onto the front lower arm, a go faster decal and sachet of grease for each bush kit.
The inner rear bush with offset internal hole to give additional positive caster. The provided sachet of grease also seems to have a leak but it's contents also seem more or less intact.
I now need to get a set of new front lower arms to complete the puzzle.
Picture below of me bushes still in its packaging. The bushes are made from Whiteline's proprietary Synthetic Elastomer material.
The inner front bush. Whiteline supplies whatever is necessary for the bush to be installed onto the front lower arm, a go faster decal and sachet of grease for each bush kit.
The inner rear bush with offset internal hole to give additional positive caster. The provided sachet of grease also seems to have a leak but it's contents also seem more or less intact.
I now need to get a set of new front lower arms to complete the puzzle.
Saturday, May 11, 2013
New Camera
Just got myself a new camera to take over the main picture taking duties for this blog. Wanted something easy to use but with decent picture quality rather than extensive features and/or compact size. I'm no camera/photo taking enthusiast and likewise budget did not stretch to a DSLR. Settled for the Nikon Coolpix P310 upon recommendation from shop. Picture below of the camera courtesy of my HTC h/phone. Cost came up to bout 800 bucks which actually was over my budget by about RM200 but what the heck, I only ever buy a camera every decade or so :P
Pictures from my last two posts and especially my WPC'ed oil pump were taken via this camera.
Tuesday, May 7, 2013
Toyo Proxes R1Rs Installed
Installed my R1Rs a couple weeks ago. Bought from and installed the tyres at SSR Racing in Bukit Tengah. I actually found this shop from Toyo Malaysia's website after looking all over Penang island to no luck. Best of all SSR Racing are just a couple km from my house. They also gave me a good deal on the R1Rs (RM 520 per tyre) and good trade in for my Dunlop SP Sport Maxx TTs. Took just bout a week or so to order and for the tyres to arrive at the shop. These are apparently the last set of 215-45 17" in Bolehland. I confirmed on the year of manufacture which was late 2012 just to ensure it wasn't old stock. Picture of me tyres as I arrive at SSR Racing for the install. Pardon the lousy picture quality from my phone's camera.
Look at the retail price!
Mounted on two of me Work rims and waiting to go on the car.
Picture of the Shark post install awaiting alignment.
SSR Racing are pretty basic when it comes to installation. They did a fairly decent job but do not offer the newer bells and whistle like nitrogen and on-wheel/car high speed balancing. They don't even shine me brand new tyres. Did that myself. Picture below of front RHS rim + tyre after some TLC. I know this is purely personal preference but I really like the tyre sidewall design and graphics. No need for flashy stuff like fire graphics.
The serious stuff. All R1Rs I have seen including mine are made in Japan btw.
Straight away the R1R exhibited more mechanical grip than my SP Sport Maxx TTs. Wheelspin is reduced as expected but not eliminated. To further reduce wheelspin will mean 225 or even better 235 wide tyres. To do this means I will need to go to at least an 8" wide rim. No money lar Bro! The stiffer sidewall and increased grip also results in a better steering feel and sharper more precise corner turn in. Tyres work from cold and I did not noticed any decreased grip during early morning sprints to work. Wet weather performance is pretty decent so long as you don't go drive like a WRC stage during a heavy downpour. I am currently running 240 kPa for both front and rear and will further experiment with different tyre pressures to see if this improves performance.
Tyre noise is also as expected more given the aggressiveness of the thread pattern. If you already find something like the Michelin Pilot Sport 3 on 17" tyres a tad noisy don't bother with the R1R. These tyres will sing their own tune/noise at all speeds even when new and one would expect the noise to increase as the tyres wear. Don't say I didn't warn ya. A stiffer sidewall also results in a stiffer ride like one has increased the damping stiffness or gone for firmer shocks. Also given the stickiness of the compound, these tyres are a sand magnet and will pick up all sorts of sand, etc on its surface. I have currently used the R1Rs for more than 400 km and will report on the performance and wear after further use.
Look at the retail price!
Mounted on two of me Work rims and waiting to go on the car.
Picture of the Shark post install awaiting alignment.
SSR Racing are pretty basic when it comes to installation. They did a fairly decent job but do not offer the newer bells and whistle like nitrogen and on-wheel/car high speed balancing. They don't even shine me brand new tyres. Did that myself. Picture below of front RHS rim + tyre after some TLC. I know this is purely personal preference but I really like the tyre sidewall design and graphics. No need for flashy stuff like fire graphics.
The serious stuff. All R1Rs I have seen including mine are made in Japan btw.
Straight away the R1R exhibited more mechanical grip than my SP Sport Maxx TTs. Wheelspin is reduced as expected but not eliminated. To further reduce wheelspin will mean 225 or even better 235 wide tyres. To do this means I will need to go to at least an 8" wide rim. No money lar Bro! The stiffer sidewall and increased grip also results in a better steering feel and sharper more precise corner turn in. Tyres work from cold and I did not noticed any decreased grip during early morning sprints to work. Wet weather performance is pretty decent so long as you don't go drive like a WRC stage during a heavy downpour. I am currently running 240 kPa for both front and rear and will further experiment with different tyre pressures to see if this improves performance.
Tyre noise is also as expected more given the aggressiveness of the thread pattern. If you already find something like the Michelin Pilot Sport 3 on 17" tyres a tad noisy don't bother with the R1R. These tyres will sing their own tune/noise at all speeds even when new and one would expect the noise to increase as the tyres wear. Don't say I didn't warn ya. A stiffer sidewall also results in a stiffer ride like one has increased the damping stiffness or gone for firmer shocks. Also given the stickiness of the compound, these tyres are a sand magnet and will pick up all sorts of sand, etc on its surface. I have currently used the R1Rs for more than 400 km and will report on the performance and wear after further use.
Thursday, May 2, 2013
Smooth and Silky - Oil Pump gets the WPC Treatment
Remember I talked about sending my oil pump for WPC treatment? Well I went ahead and bit the bullet. What I did was buy a brand new oil pump from Greg V of GSpec and Greg will personally disassemble and send the oil pump parts specifically the rotor gears, pressure relief valve piston and bore and oil pump housing for treatment. Upon completion of treatment, WPC will send the oil pump back to Greg whom will then send to my wife who is in the US for work assignment. Sounds simple right? First Greg hurt himself while disassembling the oil pump and then the oil pump arrived literally a couple hours before my wife left for her flight home. Thank goodness all's well ends well.
Original Nissan QG oil pumps for the US domestic market are made in Mexico. At least that's what the casting on the front cover tells me.
Picture below of the oil pump front cover (inner side), inner cover, rotor gears and pressure relief/regulator valve.
WPC treatment dimples the surface on a microscopic level to help maintain a good oil film for better lubrication. It also creates a hard yet smooth and silky feeling surface. This helps to reduce friction and eliminate galling. WPC treatment results in a more efficient and cooler running oil pump. You can read up more on what an oil pump does, how it works and the merits of WPC treatment over @ MotoIQ. MotoIQ also has an article on how WPC works. You can read it here.
Picture below of the inner cover (inner side). You can see how smooth and silky the surface is.
Picture of the Gerotor inner and outer rotor gears and pressure relief/regulator valve.
WPC uses a different treatment on the gears to impart more fatigue strength and lubricity than the softer aluminium housings. WPC treatment will harden the gears and greatly improve it's fatigue strength. This will make the gears more resistant to breaking under harmonic stress. Close up of the rotors. Zip tie is to hold the gears in place during shipping.
Total cost came up to:
Picture below of the fasteners required to assemble back the oil pump. Also in the picture is the spring, washer and plug for the pressure relief/regulator valve. To slightly increase maximum oil pressure, a 2-3mm shim can be placed between the spring and the plug.
The countersunk bolts are M6 x 12mm in length while the hex head bolts are M6 x 35mm. I measured coz I am thinking to replace them with titanium versions. Unfortunately Pro-Bolt only do M6 x 15mm for the countersunk bolts and want me to order 25 bolts when I only need 4 just to have 3mm shorter bolts. Excuse was due to machining set up time and cost of production. Bummer!!! Another supplier in Germany does m6 x 10mm but wouldn't ship to Bolehland. Bro Mugil, need your help!
One of the weaknesses of the QG engine is the oil pump which does not produce competitive pressure unlike other performance oriented engines. This is the reason why I do not run an oil cooler for Sharkie as an oil cooler will further lessen the already not so good oil pressure. Hotter oil is better than insufficient oil pressure. Hopefully WPC treatment will slightly increase the pressure during all engine revs and not just max pressure. We shall see as I can compare the oil pressure readouts on my dash pre and post WPC treatment and blueprinting of the oil pump. The WPC treated oil pump will be installed during my next service and oil change
Original Nissan QG oil pumps for the US domestic market are made in Mexico. At least that's what the casting on the front cover tells me.
Picture below of the oil pump front cover (inner side), inner cover, rotor gears and pressure relief/regulator valve.
WPC treatment dimples the surface on a microscopic level to help maintain a good oil film for better lubrication. It also creates a hard yet smooth and silky feeling surface. This helps to reduce friction and eliminate galling. WPC treatment results in a more efficient and cooler running oil pump. You can read up more on what an oil pump does, how it works and the merits of WPC treatment over @ MotoIQ. MotoIQ also has an article on how WPC works. You can read it here.
Picture below of the inner cover (inner side). You can see how smooth and silky the surface is.
Picture of the Gerotor inner and outer rotor gears and pressure relief/regulator valve.
WPC uses a different treatment on the gears to impart more fatigue strength and lubricity than the softer aluminium housings. WPC treatment will harden the gears and greatly improve it's fatigue strength. This will make the gears more resistant to breaking under harmonic stress. Close up of the rotors. Zip tie is to hold the gears in place during shipping.
Total cost came up to:
- Brand new original Nissan QG18DE oil pump - US$ 211.69
- WPC Treatment - US$ 100
- Shipping
Picture below of the fasteners required to assemble back the oil pump. Also in the picture is the spring, washer and plug for the pressure relief/regulator valve. To slightly increase maximum oil pressure, a 2-3mm shim can be placed between the spring and the plug.
The countersunk bolts are M6 x 12mm in length while the hex head bolts are M6 x 35mm. I measured coz I am thinking to replace them with titanium versions. Unfortunately Pro-Bolt only do M6 x 15mm for the countersunk bolts and want me to order 25 bolts when I only need 4 just to have 3mm shorter bolts. Excuse was due to machining set up time and cost of production. Bummer!!! Another supplier in Germany does m6 x 10mm but wouldn't ship to Bolehland. Bro Mugil, need your help!
One of the weaknesses of the QG engine is the oil pump which does not produce competitive pressure unlike other performance oriented engines. This is the reason why I do not run an oil cooler for Sharkie as an oil cooler will further lessen the already not so good oil pressure. Hotter oil is better than insufficient oil pressure. Hopefully WPC treatment will slightly increase the pressure during all engine revs and not just max pressure. We shall see as I can compare the oil pressure readouts on my dash pre and post WPC treatment and blueprinting of the oil pump. The WPC treated oil pump will be installed during my next service and oil change
Wednesday, April 24, 2013
New Front Windscreen and 3M Crystalline Tint
Sharkie's front windscreen has accumulated it's fair share of stone chips over the years as a result of contact with small pebbles while driving at speed especially on the Penang Bridge. Two of the stone chips were large enough to cause concern hence I finally decided to replace the windscreen. Pix below of one such chip which also caused a small crack of a couple mm. Might look like nothing now but from experience the crack will grow.
The windscreen replacement job was done @ TCEAS Bandar Perda. A brand new original Nissan front windscreen was grafted onto Sharkie after removing the old windscreen. Replacement job took bout slightly more than half a day. To allow the windscreen adhesive/sealant to fully dry do not wash the car/windscreen or drive in a heavy downpour at least 24 hours after the install. I elected not to drive Sharkie for 72 hours just to be sure given the almost daily evening showers hitting Penang recently.
Cost came up to bout RM 1123ish including install labour and top seal. Many of you will ask what about windscreen insurance? Well I did not buy any. Considering the fact the insurance is about 200++ per year and it took me 7 years to replace the windscreen we are about break even. I will definitely be insuring my new windscreen though especially with the expensive new tint. And yes, you can even insure the tint nowadays @ extra cost to the premium of course.
The tint I settled for is the 3M Crystalline having first used this on my wife's Civic. Cost came up to a massive MYR 2.5K after discount for me wife's Civic but 3M offered me a promo deal of 40% discount for the second car so Sharkie's tint was done for only 1.6K. Those of you who know me will know I use au naturale tint (i.e. NO tint for SP and Slowtra/Sharkie) so why the change now? I initially though the UV coated glass on MYDM N16 Slowtras would be sufficient but can regretfully tell you from experience that our strong MY sun will over the years damage and harden the leather upholstery and discolour the stitching without a decent tint. With the new upholstery I'm not taking any chances.
The Crystalline tint uses 3M's proprietary multi-layer technology. The working middle substrate of the film consists of over 200 vacuum deposited nano particle individual layers that block damaging UV and heat inducing IR light while letting visible light you will need to see pass through. The process used to create Crystalline was developed from 3M's aerospace division for IR (Infra-Red) sensors on satellites. This heat blocking technology means the car's air conditioning system works less resulting in improved fuel efficiency. A less taxed aircond system also means less strain on the car's cooling system which is important on a turbocharged car like Sharkie. The tint's top layer is a special scratch resistant layer while the bottom layer is an adhesive layer. The tint is non-metallic which means it will not interfere with h/phones and GPS. Your Touch 'n Go Smart Tag unfortunately will not work. 3M claims the non-metallic tint will not internally oxidise or fade purple ensuring a longer life when compared to lesser tints.
I decided to use the almost clear Crystalline 70 for the front windscreen and Crystalline 60 everywhere else. Don't want to attract unwanted attention from JPJ. The number denotes the amount of visible light transmitted through the tint or in simple English the lesser the number the darker the tint. Specs below of the various Crystalline films.
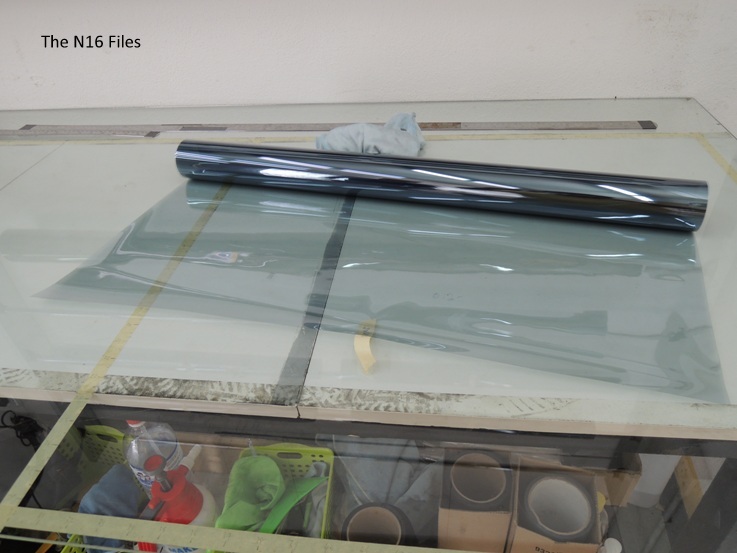
Picture below of the Crystalline tint. (70 methinks but can't really remember). Sorry.
The tint was professionally installed by Shine Guard @ Auto City, Juru, Penang. Apat from Auto City, Shine Guard branches are also located at Jelutong on the island and Jalan Song Ban Kheng BM on the mainland.
The install took about 4 hours but bear in mind there was no old tint to remove from the Shark. Picture of the Shark post installation.
Shine Guard took the trouble to place these stickers on all my power window switches and also the rear demister button.
The 3M logo watermarks are everywhere to indicate you are using the original 3M tint and not a counterfeit. Beware of fakes. I am told these are in abundance. 3M issues a warranty card and serial number for every install.
The Crystalline works pretty well and cools pretty fast the moment you get into the car and drive with the aircond turned on after a hot day. Of course don't expect miracles and a cool car especially after your car is parked under a hot sun the entire day. The front windscreen tint developed a small bubble post install and the entire windscreen tint was replaced no questions asked. Excellent service!
The windscreen replacement job was done @ TCEAS Bandar Perda. A brand new original Nissan front windscreen was grafted onto Sharkie after removing the old windscreen. Replacement job took bout slightly more than half a day. To allow the windscreen adhesive/sealant to fully dry do not wash the car/windscreen or drive in a heavy downpour at least 24 hours after the install. I elected not to drive Sharkie for 72 hours just to be sure given the almost daily evening showers hitting Penang recently.
Cost came up to bout RM 1123ish including install labour and top seal. Many of you will ask what about windscreen insurance? Well I did not buy any. Considering the fact the insurance is about 200++ per year and it took me 7 years to replace the windscreen we are about break even. I will definitely be insuring my new windscreen though especially with the expensive new tint. And yes, you can even insure the tint nowadays @ extra cost to the premium of course.
The tint I settled for is the 3M Crystalline having first used this on my wife's Civic. Cost came up to a massive MYR 2.5K after discount for me wife's Civic but 3M offered me a promo deal of 40% discount for the second car so Sharkie's tint was done for only 1.6K. Those of you who know me will know I use au naturale tint (i.e. NO tint for SP and Slowtra/Sharkie) so why the change now? I initially though the UV coated glass on MYDM N16 Slowtras would be sufficient but can regretfully tell you from experience that our strong MY sun will over the years damage and harden the leather upholstery and discolour the stitching without a decent tint. With the new upholstery I'm not taking any chances.
The Crystalline tint uses 3M's proprietary multi-layer technology. The working middle substrate of the film consists of over 200 vacuum deposited nano particle individual layers that block damaging UV and heat inducing IR light while letting visible light you will need to see pass through. The process used to create Crystalline was developed from 3M's aerospace division for IR (Infra-Red) sensors on satellites. This heat blocking technology means the car's air conditioning system works less resulting in improved fuel efficiency. A less taxed aircond system also means less strain on the car's cooling system which is important on a turbocharged car like Sharkie. The tint's top layer is a special scratch resistant layer while the bottom layer is an adhesive layer. The tint is non-metallic which means it will not interfere with h/phones and GPS. Your Touch 'n Go Smart Tag unfortunately will not work. 3M claims the non-metallic tint will not internally oxidise or fade purple ensuring a longer life when compared to lesser tints.
I decided to use the almost clear Crystalline 70 for the front windscreen and Crystalline 60 everywhere else. Don't want to attract unwanted attention from JPJ. The number denotes the amount of visible light transmitted through the tint or in simple English the lesser the number the darker the tint. Specs below of the various Crystalline films.
Picture below of the Crystalline tint. (70 methinks but can't really remember). Sorry.
The tint was professionally installed by Shine Guard @ Auto City, Juru, Penang. Apat from Auto City, Shine Guard branches are also located at Jelutong on the island and Jalan Song Ban Kheng BM on the mainland.
The install took about 4 hours but bear in mind there was no old tint to remove from the Shark. Picture of the Shark post installation.
Shine Guard took the trouble to place these stickers on all my power window switches and also the rear demister button.
The 3M logo watermarks are everywhere to indicate you are using the original 3M tint and not a counterfeit. Beware of fakes. I am told these are in abundance. 3M issues a warranty card and serial number for every install.
The Crystalline works pretty well and cools pretty fast the moment you get into the car and drive with the aircond turned on after a hot day. Of course don't expect miracles and a cool car especially after your car is parked under a hot sun the entire day. The front windscreen tint developed a small bubble post install and the entire windscreen tint was replaced no questions asked. Excellent service!
Thursday, April 11, 2013
Leather Fetish
Had my rear seats re-trimmed in black leather with red side stitching to match the front Recaros.
The leather upholstery was done by the good guys over at DK Schweizer whom also previously did my seat leather upholstery. As usual the black is blacker cept my ancient Olympus camera had trouble resolving the actual colour. Close up pictures.
I also had the doors trimmed.
Likewise the front centre arm rest cover.
Damage was RM 1.7K for the rear seats, door trim and front centre arm rest cover. DK was giving me excuses about the gearshift boot so I bit the bullet and ordered one in top grade Nappa leather from Redline Accessories USA. Ordered the front centre arm rest also in Nappa leather to match. Cost for the shift boot and front centre arm rest cover was USD122.82 including shipping. Picture below.
Pictures to follow once I install.
Subscribe to:
Posts (Atom)