Friday, September 21, 2012

Another Ride in the Lemon

My Mishi rad is back from its mod job. Jack did the delivery duties to GT Auto via the Lemon again. Is my radiator one lucky rad or what? Two pictures below of the mod job. Quality work eh? Pictures courtesy of Jack.

And this is how the machined 28mm aluminium tubing looks like before the mod job. I have no idea who the finger model is.

I also have a more extensive and trick radiator/cooling system in the works. Does SPAL and possibly PWR ring a bell? :)

More to follow after re-installation. 

Sunday, September 2, 2012

A Ride in the Lemon

My Mishi radiator that is and not me :(

Rad is on its way to a mod job and should be back for install on the Shark in a couple weeks. Meanwhile the Shark's paint job has just been completed. Toby did not send me any piccies. Pls be patient.

Thursday, August 30, 2012

The Lemon

This blog is for the Nissan N16 Sentra but I'm really inspired to write about me Bro Jack's build which IMHO is arguably the most impressive in Bolehland. The Lemon is a yellow (what other colour would you expect a lemon to be? :) Mitsubishi Lancer Evolution 7. Most people with lotsa moolah have no problems slapping on expensive aftermarket trick parts but the Lemon's build is an exercise in custom engineering more than a year in the making. It's a classic BST (Blood, Sweat and Tears) story. I can still remember carrying it's forged Wiseco pistons and Golden Eagle conrods back home from the US earlier on in the year. The results however are more than worth it. Picture below of the Lemon's engine bay.

All parts were sourced for and specced by Jack and he isn't even an engineer in profession. Some aspect of the build which really impressed me include:

Most people know how to use Earl's non-asbestos flame guard insulation but just look at the picture above how it is so nicely terminated with heatshrink. I am in awe!

Titanium fasteners everywhere. And I mean everywhere including even vband clamps. Below is one such order. This is one of many many orders. Mad is an understatement!

Where titanium fasteners are not suitable one will find ARP 12-point chromoly equivalents. Here's one such example of the turbo manifold. Others are on the flywheel, etc. I learned of ARP exhaust manifold studs from Jack. Jack even bought the tools for such fasteners.

Every fluid line that can be converted to AN with stainless braided hose have been done so and some more. Even the vacuum lines on the brake vacuum booster mind you. Forged AN fittings are used despite costing more for better clearance and routing. Oil catch tank is custom fabricated.

Custom stainless steel water lines compared to the mild steel stocker. Mind you once everything is assembled back one will never see this beautiful part unless you know where to look .

No sweat upgrading one's oil filler cap but look at the implementation on the Lemon. It's all in the details. PCV has been replaced by a forged AN fitting.

This is just for the engine build. I won't go into any further detail on the wiring, chassis, suspension, transmission build, all which are equally impressive. Even the aero! Hope you are as inspired as I am.

Saturday, August 25, 2012

Ultimate Pedals Accelerator Pedal Pad

My accelerator or "gas" pedal pad from Ultimate Pedals finally arrived. If you can recall I only "upgraded" my brake and clutch pedal pads with original Nissan aluminium faced equivalents from a Z33. I could not upgrade the accelerator pedal pad and the reason is listed in my previous post.

Takes bout 2 weeks to custom manufacture upon placement of order. I choosed the shiny (brushed) smooth without grip inserts option. You can refer to the other options here. Service was first class and Robert from Ultimate Pedals answered my every email. Cost is quite prohibitive with shipping involved and probably equivalent or more than all three (clutch, brake and accelerator) universal pedal pads from the likes of Sparco.

Picture below of the installation instructions and accelerator pedal pad still in its bubble wrapping.

Pedal pad unwrapped. Material used is 6061-T6 aluminium with anti-slip surface finish. Self taping stainless steel screws are provided but I would have preferred some proper countersunk bolts and nylock nuts. Yes, you will have to drill your accelerator pedal. Quality is excellent with curvature and contour exactly matching the stock one piece accelerator pad. This is what custom is all about vs the one size and shape fits all universal pedal pads abound in the local market.

Need to arrange for delivery to Toby @ GT Auto for installation. I have also decided to replace the screws with some titanium countersunk bolts and nuts :) Pictures to follow post install.

Friday, August 17, 2012

Paint Job

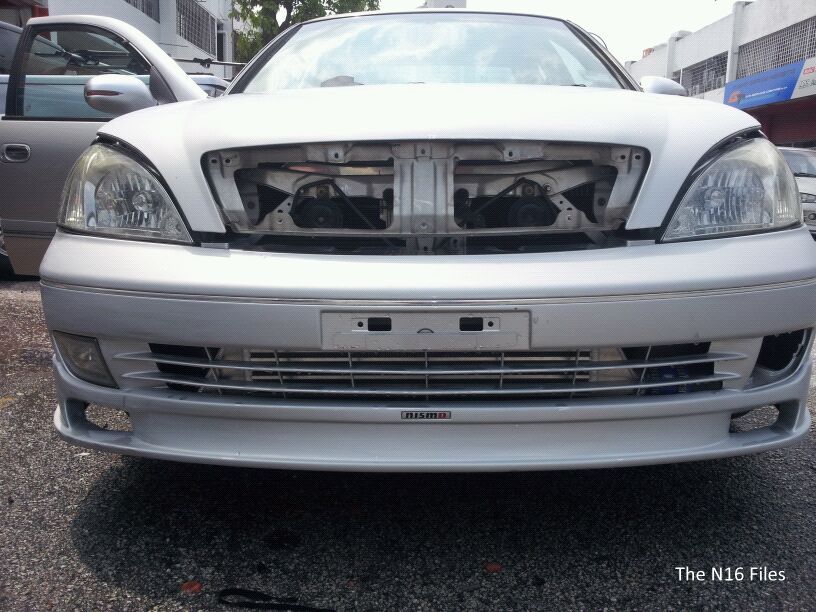
The last time the Shark got painted was exactly two years ago. Since then the usual dings, chips and road rash from pebbles, etc have started to accumulate on the bumper, Impul front grille and front of the bonnet so I decided to send the Shark in for its long pushed out beautification job. Picture below of the work in progress.

Sans grille.

Stone chips fixed and awaiting paint job. The Shark is daydreaming that it can one day be as fast as the Porsche 911 in the background.

I'm also starting to think about more aero work. The functional type though a bit of bling won't kill so longs as its not overdone :) Might replace the Mine's Multi Select Carbon Rear Wing with something better. Maybe an APR GTC-200? What do you think?

This means my Mine's rear wing will be for sale. Anybody interested?  Asking for one third its original price.

Saturday, August 11, 2012

More Yummy Yummy! - Continued

OK I'm spilling the beans. These are cams for my QG18DE from Kelford Cams. Cams are a regrind profile and are to extend my engine's power band on boost which tails off a bit too soon for Toby's liking. I had my stock cams sent to Kelford in New Zealand together with other engine build and powerband details and a couple weeks later these came back. Two pictures below.

Lift and duration details. Cam profile is suitable for stock valve springs. Idle quality will be like stock. Cost is approximately $650 USD depending on the exchange rate plus your stock cams. Cost does not include shipment.

More details to follow once Toby is back. Bro is currently Down Under for WTAC amongst other things :) Here are a couple piccies to wet your appetite. Sorry no race queens or promo girls. All pixs courtesy of Toby.


Detailed WTAC event coverage including more upskirt pics can be found over @ MotoIQ. As I type this Nemo has just won WTAC with an unbelievable 1:25.0200 which if I remember correctly is more than 3.5 secs faster than the record posted last year by the legendary Cyber Evo.

Tuesday, August 7, 2012

More Yummy Yummy!

Toby just sent me this picture.

Hint Number One: What comes in pairs and is meant for the QG18?
Hint Number Two: Could be the only pair in the world
Hint Number Three: Sorry Bro. It ain't a pair of seat rails :)

More details coming up. Please be patient as slow and steady development work is required.

Tuesday, July 31, 2012

Oil Change Progress Part 7

Bro Mugil, Peter and Nick all choosed to drop by GT Auto on the same day and gave me a good update on the progress of the work. Needless to say my WhatsApp and email were very much alive that day. Thanks Bros!

My AIM MXL Strada dash has been installed. Workmanship is top notch as per Toby and GT Auto's usual excellent standards. I can spend a long long time looking and admiring pictures of my dash. I know, I know, I have a problem :) Sexy knee in the top pix belongs to Bro Nick methinks.

Closer up.

In use. Cluster lid and other dash trim has not been installed back at this point.

Because Toby is having a problem configuring the gear indicator. The MXL is able to display gear in use/selected gear and has a simple procedure for it to learn the gears using rpm and speed channels. Procedure is as follows:
  1. Once gear calculation has been activated a track lap has to be run. During the lap follow carefully these instructions
  2. Engage all gears
  3. Keep each gear engaged for at least 5 seconds
  4. Drive smoothly, avoiding sudden accelerations, tyre slip or wheel blocks when braking; let PM grow gradually and keep braking as long as possible according to track and traffic conditions; if using a non driving wheel speed as reference pay particular attention to your driving style. Reduce as much as you can sliding between driving and driven wheels.
  5. Go to pit lane (or your workshop/house) at the end of the lap and power engine off. Absolutely avoid revs while the vehicle is moving. Avoid running pit lane with the clutch pedal engaged. You can press the accelerator pedal before switching engine offif needed but with the vehicle completely stopped.
Sounds easy and simple right? Unfortunately the calibration is not working as mentioned and there is no ability to input gear ratio, etc into the MXL. Sigh! Anybody with experience on the AIM MXL Strada/Pista can help here? Neel (my dash supplier) is doing his best to help but issue is further complicated by the different time zones involved. Sigh.. The "RUNNING GEAR CAL" on the dash display is giving me nightmares.

My Mishimoto radiator was also getting installed.

As expected the Samco radiator hose meant for the QG18 does not fit the radiator. I have already explained why in my previous post. More mod and fabrication work here. Reservoir hose also needs to be upraded to a Samco silicone or equivalent.


My poor stock radiator looking all forlorn being abandoned after 6+ years of faithful service. It (the radiator) is still working well despite more than 1 bar of boost but I really need the additional safety margin of a radiator with increased cooling capacity.

The Mishi radiator cap will be ditched as the quality is suspect from what I read on the forums and the net. Bro Peter helped bring back for me a Cosworth radiator cap. I bought the 1.3 bar unit. Thanks Bro! Not that anything is wrong with my Nismo radiator cap but I fancy a change after a couple years. Pictures of my Cosworth radiator cap. Wish Cosworth made more parts for my engine :(

Bro Peter also got me the AEM water/methanol injection filter. The kit AEM sells does not come with this filter. This is additional insurance as the filter helps in the long run allowing a cleaner flow of water/methanol into the engine protecting the water/methanol injection filter pump as well as the engine internals. AEM claims the filter is able to filter particulates as small as 40 microns.

I have no idea why parts of the instruction manual are wet. Peter, what have you been doing?

I also ordered a pair of Recaro SR4s complete with rails from H Performance. The seats are ready but will only be fitted at the very last. More to follow.

Wednesday, July 25, 2012

Got a Bigger Lighter?

Boost was increased to 1.3 bar yesterday and the water/methanol injection activated. Resultant dyno with and without meth injection.

Why only a 7hp increase at the wheels with methanol injection and the squiggly lines at the top? Well the top end is breaking up due to my stock ignition and Hitachi coil-on plugs (COP) reaching its limit and struggling to keep up. At only 1.3 bar :( I need a better CDI and COPs. For CDI am thinking of the Autronic unit but cost is quite prohibitive. The COP is also going to be a problem. Okada Projects is not interested. AEM Pencil Coils are unreliable from what I read on the Net. And either option is not cheap. Anyone have any suggestions? Anyone have experience the AEM Pencil Coils or with T.M. Works?

Alternative of course is to temporarily stop the development work at this point. 301 hp at the wheels already translates to 331 hp at the engine assuming a 10% transmission loss. Torque is an equally monstrous 40 kg/m or 392.266 Nm at the wheels. This is much more than sufficient for daily driving with the Shark already feeling very fast at 30hp less. Going more than this is going to result in a bigger hole in an already near empty wallet. Decisions, decisions....

Saturday, July 14, 2012

Hello World

Toby sent me these cheeky pictures.

And a video. Pardon the small size. The original video sent to me was rotated 90 degrees meaning one had to turn one's head likewise to correct the orientation when looking at the video. I corrected the orientation but unfortunately size became smaller.
More to follow..

Wednesday, July 11, 2012

Oil Change Progress Part 6 - Reincarnation

Its been more than a month since I've had time to visit GT Auto to catch up on the progress of the build. In summary the work is near the finishing line. First thing I saw when I arrived was the Slowtra parked outside GT Auto.

Here's pictures of the engine bay. Water on my battery's top surface came from my bonnet as Slowtra just had a good wash.

The oil catch can is connected and Toby is using a ZeroOne unit. Would have preferred the original Cusco I used on the SP rather than a copy but I'll settle with this for the time being as the oct has been modified to accept AN fittings. Need to ditch the ricey ZeroOne logo though. Picture below of the Full Race EFR BOV cover installed on my snail.

Here's a picture from under the car. Which one is the Bosch LSU 4.2 5 wire wideband O2/lambda sensor?

I also spied my Mishimoto radiator awaiting to be installed. The radiator is actually for a USDM B15 Sentra Spec-V with QR25DE engine but the only different is the diameter of the intet/outlet. QG18DE inlet/outlet is 1 1/8" or 29mm whereas QR25DE is 1 3/8" is 35mm. This means the Mishi rad will need some modding to fit the QG18DE radiator hoses. It's either that or I mod the water/coolant inlet/outlet on the engine side.

The Mishi rad is dual row and core thickness is 1.42" or 36mm. Them Americans like everything in imperial inches and I have to make my own conversion. Quality is pretty decent cept the radiator cap. Will be ditching that but still deciding if I want to use my Nismo radiator cap or get a Cosworth equivalent. Clearance to the snail will be a major issue so I also bought the Mishimoto dual slimline fan aluminium shroud kit. Unfortunately the fans looks pretty marginal in build, performance and quality. According to Toby I currently don't have any high temperature/overheating issue with my stock radiator and fans but will have one if I install these. Below are pixs of the fan.

Here's how the 12" (305mm) Mishi fans compare to stock. Look at the difference in size. If I go for slimline fans guess it'll have to be better sized, build and performance SPAL fans.

I also saw work being done on my dash. There was a delay as it took quite some time to source for a used meter panel which will be used to fit my AIM dash.

The plate of pre-preg carbon being cut up to accomodate the AIM MXL Strada dash is from Bro Mugil. Thanks Bro! Did I tell you before it is a real PITA to cut real pre-preg carbon? The only thing worse is carbon kevlar which will wear out your cutting blade in no time.

My water/methanol injection kit has also been installed. I am using an AEM system. You can read up on the merits of water/methanol injection in MotoIQ's excellent article. AEM uses a machined billet aluminium injector which comes with 3 interchangeable nozzles to cover a wide range of potential horsepower levels. The injector features an integral check valve that prevents terminal engine failure caused by unintended fluid flow. Below is a picture of the AEM's injector installed just before the throttle body.

I am using the AEM's own boost referenced progressive controller rather than have it just triggered on/off by my Autronic SM4 ECU. This is because basing an injection progressively on manifold pressure allows for correct amount of water/methanol to be injected at all points along the engine's power curve. At lower boost levels where only a small amount of water/methanol is needed, the controller drives the pump at low speed delivering the necessary flow rate. As boost increases, along with intake air temps increasing as well, the controller increases the pump speed allowing for more water/methanol to be injected into the engine,helping to cool and control combustion where it is needed most. The controller has a warning light that will activate if it detects a fault i.e. broken wire/bad connection, controller malfunctions or system runs out of water/methanol. Sorry forgot to take a picture of the warning LED light mounted on my dash and the progressive controller. Will take those is due time.

Picture below of the AEM's pump and 1 gallon water/methanol tank installed in the Slowtra's boot. An optional (read buy separately) 5 gallon tank is also available.

AEM's latest heavy duty recirculation pump is rated to 200psi. The earlier pump is rated to only 150psi. The new pump is also much quieter in operation compared to older switched-style pumps. AEM has designed the pump with Santoprene diaphragm and EPDM seals to withstand methanol (alcohol's) harhness and corrosion characteristics. The one gallon fluid tank comes fitted with a pre-installed low level switch to notify you when you are running out of water/methanol. 1 US gallon is equivalent to 3.78541178 liters btw. The kit does not come with a filter which I'm debating whether to get. AEM sells an in-line filter that uses a micronic mesh screen to filter particulates as small as 40 microns. This allows a cleaner flow of water/methanol into the engine, not only protecting the internals of the engine itself but also the working parts of the AEM water/methanol injection pump. All the install, set up and tuning is and will be done by Toby and GT Auto.

Me buddies have decided to call the Slowtra "Shark" after this post and the nick kinda stuck from then on. Guess I'll be calling me car the Shark or Sharkie moving forward :) Toby casually threw me the Shark's key after it had a good bath and I got into it along with Toby and another buddy Peter in the back seat to find out if the driving experience lives up to the new nick.

Happily potted around Sunway and the engine felt very tractable and smooth. Think I can drive all day like this and it feels like a 2 litre+ NA compact car with manual gearbox. Did not feel any lag or flat spots during my short drive. Had a couple opportunities to floor the throttle in 2nd and 3rd gear and boy what a power rush!!! Yeeha!!! Damn bloody shiok this EFR 6258 snail! The Shark felt very together and the Nismo LSD did it's best though wheelspins were unavoidable although you don't get that uncontrollable turbo rush and chassis tying itself into knots. The Nismo also felt quieter and less harsh in operation compared to the Kaaz LSD I used previously on the SP. However like any typical 1.5 way LSD go into turns/corners too slow and steady and the LSD will still cause understeer and steering pushback. Nothing too bad though and manageable on daily driving basis. The Clutchmasters FX-400 6 puck clutch with lightweight flywheel proved to be even more surprising with very minimal to no judder and a possibly lighter clutch pedal feel than the Exedy I was using previously. I say possibly as I haven't driven with a car with the Exedy in more than 6 years.

The Shark is close to its homecoming. Still need to sort out a few stuff including proper front seats that will provide proper hold and support during hard cornering.