Thursday, December 19, 2013

Stripped

Those of you reading The N16 Files since the early days will (hopefully) remember I added quite a bit of sound deadening to the Shark's doors, boot lid, etc. While the sound deadening worked to a certain extent the negative side meant a lot of unwanted mass was also added to Sharkie. With ICE no longer on the agenda I have decided to remove some of the sound deadening which will also result in weight reduction and improving the power to weight ratio. Before I can get to the sound deadening I first removed the vanity carpet covering the boot/trunk lid's bottom underframe. This is held in place via twelve plastic pins. Picture below of the carpet.

Here's an old pix of the sound deadening covering the bottom of the boot lid.

To remove the sound deadening you need a lot of muscle power, BST, patience and time. Really lotsa time. Took me many hours to remove the sound deadening and to get the underside looking good. You will also need the below to scrape off the sound deadening as it adheres via a strong adhesive. You can buy the below from hardware stores like ACE and is typically used to apply wall plastering. Make sure you get a plastic one else you will end up scratching and/or damaging your boot lid.

Was told dry ice works wonders but I didn't try so can't vouch its effectiveness. Bout half or more of  the sound deadening came off relatively easily till the sections below.

In my excitement I threw the already removed pieces of sound deadening away before weighing. When I remembered I couldn't be bothered to take them from the smelly dustbin to weigh. Sorry. Anyway the remaining as per picture above came up to 443 grammes (0.44 kg) on my weighing scale.

This means the sound deadening on the boot lid alone will probably weight around 1 kg. Vanity carpet was about 0.4 kg so a total of about 1.4-1.5 kg was removed from the boot lid. The weight reduction is really noticeable when you lift up the boot lid. Below's a close up of the sticky adhesive residue left behind once the sound deadening is removed.

With all the sound deadening removed. The left corner looks pristine in the pix below coz I already cleaned it.

You will need a wax like Soft99 Meta-Clean or something like WD40 to clean off the adhesive residue. And again loads of BST, patience and time. Here's the end result. My wife asked me why not just get someone else to do it but I like my DIY and am a sucker for punishment. Blistered a finger doing this job.

There are still some slight yellow stains from where the adhesive/glue has stained the paint's clearcoat. I have tried polish and wax but the yellowness will not go away. Will probably leave it as is as the only permanent solution would be to repaint the entire underside of the boot lid.

I also decided to remove the heat/NVH insulation covering the front bonnet/hood's underframe. Picture of the insulation post removal.

Not every car has this insulation and for an N16 I believe the main purpose would be engine bay noise reduction. Like the vanity carpet underneath the rear boot lid the insulation is held in place via 12 plastic pins. The front pins are totally different from the rears with the fronts easier to remove. Just use your fingers, fondle and pull. For the rear clips you will need a Phillips screwdriver. Use the Phillips screwdriver to turn the centre pin and then slowly lift it up. Make sure the outer pin does not move along with the centre pin else you are wasting your time. Once the centre pin is partially out it should be easy to remove the entire pin assembly. I decided to weigh all 24 front and rear pins just for kicks!

The front bonnet underframe insulation weights approx 0.6 kg. Pictures below of the front bonnet's underside with the insulation removed. Very dirty as there is more than 7 years worth of accumulated grime, oil and dirt.

Here's how it looks after lots of BST cleaning.

In conclusion I have reduced Sharkie's weight by bout 2 kg or 4.4 lbs and this is probably a conservative estimate. I hope I also lost some body weight with all the hard work and exercise :) Downside would be a noticeable increase in NVH from the rear boot lid. Can't have your cherry with the icing and cake.

Saturday, December 14, 2013

AIM MXG

Apart from "releasing" more pictures and details of the long missing in action MXL2, AIM has also just released details of the new MXG dash logger. The MXG brings AIM up to date with the latest technology display wise via a 7" high contrast 1100 lumen TFT display. Per AIM you can create as many pages as you wish, showing in different fonts and dimensions all data/info received by the MXG, as well as math channels. More details and specs in AIM's FB page. Price is estimated at around US$ 2599.00. Pictures and drawing below courtesy of AIM.
 

The availability date for the MXL2 is now February or Q1 2014 which is about 1 year later than originally promised. I don't yet have the availability date for the MXG but there should be sufficient time to start saving :)

Stop Press! AIM has just announced that the release date for MXL2 & MXG will be during the 1st Quarter of 2014. This means anytime from January to March.

Monday, November 18, 2013

Carbon Pillar Trim/Garnish

Getting any off-the-shelf carbon fibre parts specific for the N16 is next to impossible. There are some nice carbon parts for the USDM B15 including bonnet/hood, rear boot/trunk lid but these won't fit the N16 due to the different front and rear end styling Nissan uses for different markets. However I theorized carbon pillar garnish/trims for the B & C door pillars meant for the B15 should also fit the N16 which led me to a worldwide hunt... OK.. I just typed "B15 Sentra carbon pillars" on Google.

Got this from a US supplier on eBay. These have a real carbon layer unlike the fake 3M sticker stuff commonly available in Bolehland nowadays. Cost including should be between 300-340 smackers (USD 101.72) depending on the exchange rate. Picture of the nice packaging

Includes a brochure.

Opening the box revealed the following. There is an adhesive layer on the packaging which the carbon pillar trims adhere to to prevent movement and damage during shipping. Cool! But why so many pieces?

Picture below of the door pillars If you look there are already 4 sections each side not including the thin piece of plastic sectioning the rear door window but frankly I would just cover up the plastic and leave the smaller rubberized section alone.
 
Other side has a adhesive layer. Peel of the red backing tape and stick the carbon pillar garnish to your car's pillar.

Close up. Having done something similar during my SP days unfortunately this does not meet my quality standards. Seems to be only one layer of carbon cloth and too much epoxy or gel resulting in something too thick for my liking.

Also the carbon pillar garnish is slightly shorter than the pillar on the N16 by a couple mm.

I have decided not to use this and will custom make my own. Letting go for half the cost I bought this for. Anyone interested please contact me.

Wednesday, November 6, 2013

Irresponsible

I guess I have been very fortunate till now. In my more than 10 years of modding and purchasing parts I have always come across vendors/suppliers that are more less true to their word and have always delivered what I ordered albeit not always on time. There are also vendors like Greg from GSpec that will bend backwards to help customers. This recent case unfortunately has "broken the record" :(

I ordered my BC Racing ER series coilover dampers back in May this year from a vendor in the US. When I ordered I specified the ride height I wanted and what I would be using the car for (daily driving and occasional track use). To save on shipping, etc. costs I timed my order to when I would be in the US for work assignment with the intention to personally carry the shocks back home with me. If you ask me why go through all the trouble when there is a BC Racing supplier in Malaysia? Well the problem is I inquired multiple times with Daniel whom I bought my BRs from and was told there was no ER application for N16s but here was a vendor in the US that had such an application including pictures. You can read up here. BC Taiwan has also not until very recently only published an ER listing for the N16/ B15/G10.

Upon unpacking the shocks at first glace the shocks and springs did look a bit short but in my rush to pack everything for my flight back home the next morning this relegated to the back of my mind. I later confirmed via measurement that the springs and likely damper body are too short. Details here. Several emails to the vendor went unanswered and I eventually emailed BC Racing NA (North America) to assist me. BC Racing NA stated that the coilover dampers should be able to meet my specified ride height. The vendor later replied mentioning that the coilover damper and spring were a standard Sentra requirement. As you now know this is NOT the case. Further details here. Also the spring length will not dictate the ride height due to the design of these dampers. The damper body is basically too short. I sent an email back asking for assistance but no response. A week or so passed and I got agitated mentioning I want a refund. This is when the vendor replied. Here are some excerpts from the email exchange and my thoughts/response:
  • Please note there are other available options to the desired results you are trying to achieve which are widely used in racing. Before mentioning those, I would like to point out that the ER series coilover is a race setup and is designed to be used on a lowered chassis. Based on your ride height pictures I see no change in this or "hellaflush" position as you claim - Don't you think this should have been mentioned when I ordered the shocks?
  • However, we have noted these types of emails and requests for refunds is becoming common with your orders, along with having your parts delivered to hotels in the United States so you can pack them in your luggage and not claim the required duty and taxes. - Errr, is this a threat? As far as I know I have not done anything illegal. I have never directly asked for a refund from this vendor before this latest ER case. The first case was a damaged crank pulley which to the vendor's credit got replaced when I asked for a replacement (not refund) but I did send the damaged crank pulley back to him. The second case was when I ordered a carbon fibre part from the vendor's website. The website told me this part was no longer available but I got a sms from the bank mentioning that my card had been charged. Of course I called the vendor to clarify and to refund me if indeed my card got charged which luckily the card was not so case closed.
  • Demanding full refunds for fully functioning parts and putting companies on blast in your blog is a quick way to develop a reputation among our vendors and the community.  It appears that you are a customer who prefers to get one over on vendors and then promote how this was successfully achieved - Everyone is welcomed to read my blog in its entirety to see if this is true.
  • The second email after my response only had the following - In no way was it implied the ER series will provide up to a 645cm ride height.  They are designed for lowered chassis and racing -not for a ride height 2cm from stock.  The pictures you posted with the ERs is NOT hellaflush as you claim and meets the requirements for the ER series coilovers.  We do not see the issue with the coilover design.  We suggest either running a higher profile tire or the spacer as mentioned.  I do apologize they do not meet your raised height requirement but we cannot accept these for a return. - What do you think? Should I have been told this when I ordered? Would this have been the responsibility of the vendor that sold me the ER. Having raced a Sentra would he then have known the difference between daily driving vs racing?
  • The offers we made above apply (to buy more parts to fix my suspension geometry problem with too low a ride height), however, based on your history we would prefer that you look elsewhere for your N16 products.  - Wah.. Adding insult to injury?
  • BC Racing NA did try to help but after many weeks eventually told me the following - I need to reiterate with you that we fulfulled the order as it was given to us by.... We had nothing to do with you recieving the incorrect length springs and had no knowledge of any prior arrangements and specifications given before the order was made. No annotations or specifications were on the order we recieved so we fulfilled it as we normally would with the spring rates requested. If you feel like you have been wronged, I apologize but I have scoured every avenue in an attempt to help you as much as possible to no avail.
  • To summarize basically I would need to buy a complete set of longer ER damper bodies to realize my ride height. At my own cost of course. And without any discount. And it took 3+ months including me spending more money to test install the ERs to come to this conclusion.

The N16 Files is a technical resource for N16 Sentras and should be devoid of such drama. However I am compelled to inform readers of my most regrettable experience with this vendor and not to mention I now have very expensive (in fact the most expensive shocks I have owned) shocks that I cannot use for daily driving. If you need further details please do contact me.

Monday, October 21, 2013

New Rear Badges

This initially started out as an effort to replace the "Sentra" badge which was beginning to looked a tad worn and faded. Got the badge from TCEAS. Cost me less than a hundred smackers if my memory serves me right.

While surfing around the web I came across the Juke Nismo. What caught my eye was not the fugly crossover vehicle but the new style Nismo badge attached to it's rear. Here's how the new style Nismo badge looks like.

But wait... Don't I already have a Nismo badge on the Shark? Those of you following The N16 Files from its early days will know that I sourced a Nismo badge from Bro Eu Jin more than 5 years ago. Research revealed that Nismo started using the new style badge on all its 2013 onwards models. This includes the Juke, 370Z, the errr... Almera Nismo Concept and it's SuperGT GT500 and GT3 R35 GTR racecars. Here's how the badge looks like on a 2013 GT500 R35. Picture courtesy of Nismo website.

Which means my Nismo badge is now "obsolete". Still looks as good as new though. I first asked Bro Eu Jin earlier in the year for the new style Nismo badge but was not available then. 6+ months down the road, Eu Jin contacted me with the good news that the badge is now available. I placed an order for the badge and 1+ month later the below arrived via Pos Laju.

The next time you (and yours truly included) ding parts made in China please bear in mind where even the likes of Nismo nowadays make some of their parts from. Yes, The People's Republic of China. So much for JDM. From picture below quality still looks first class. Compare this with all the replicas/fakes out there and frankly you have to be blind to not see the difference (in quality and finish).

Took me bout forty minutes to DIY install both badges. Masking tape is to help with the alignment.

The end result. The new style Nismo badge is smaller when compared with the old style badge. IMHO would have preferred for it to be the same size as the old style badge. Cost me bout 80% the cost of the old style badge or RM3XX. Made in China doesn't mean it's cheap :( For actual pricing check with Bro Eu Jin.

Having a lighter wallet also helps to improve the Shark's power to weight ratio.

Tuesday, October 8, 2013

Renewed

After more than 7 years the Nismo badge on the Shark's front and rear bumper skirting looked a bit faded and pitted from all the exposure to sun, rain, road sand, etc. Bought some Krylon Short Cuts Paint Pens from Ace Hardware to repaint the Nismo wording on the badges. From eyeballing the closest colours or what was available are gloss black and chilli red.

Below are the after pictures. In my haste I forgot to take some before pictures but I believe the after is what you are interested in anyway. The front.

The rear.
 
Should hopefully last me a good few years more till the next repaint/touch up. Who knows by then Sharkie might be wearing full carbon bodywork..

Sunday, September 22, 2013

OCB

"Mad!" said a Bro. "It's just a bracket!" exclaimed another Bro. "Like you only know Saw today" responded yet another Bro. Wife just knowingly smiles having coped with me all these years. She came home from work one late evening to find me at the kitchen basin sanding away (more on that later). I don't know what fellow readers of The N16 Files think of this article but I'll like to nicely call this "Obsessively Compulsive Bracketry".

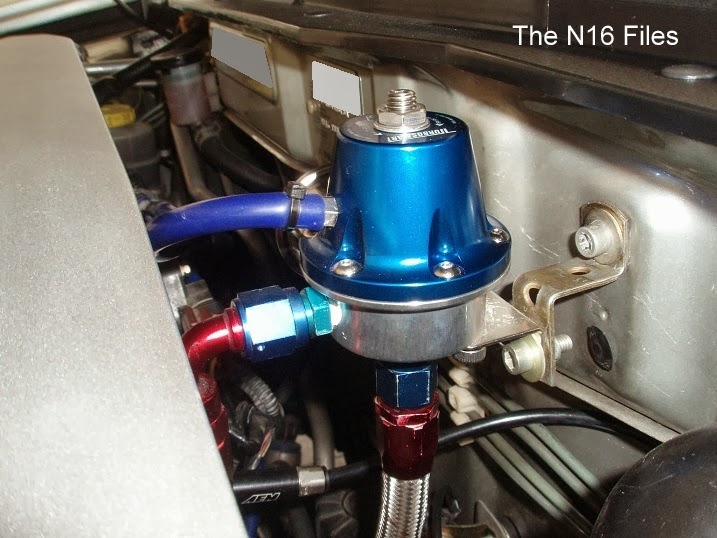
Picture below of the mild steel bracket fabricated by GT Auto for my Turbosmart FPR-800 fuel pressure regulator.
 
The bracket itself

The more I looked at my fpr the more the familiar niggling feeling to replace the bracket grew stronger. Not up to my standardlah! I also took the opportunity to replace the crappy bracket for my ICE power supply cable. Picture below of the bracket.

Took both brackets to Bro Jack's chief engineer Ah Tiong who promptly fabricated for me some aluminium equivalents.

Here's how the new aluminium fpr bracket compares to the original mild steel version. Besides looking better the new brackets being aluminium are also lighter. The fpr bracket for instance weighs half the original mild steel bracket despite being thicker and without the additional "lightening" holes.

The new brackets still look unfinished so I bought a range of sandpaper to personally finish. Ain't no one gonna do the finishing for you as this takes a lot of time and if someone tried to make some money from all the hard labour frankly you ain't gonna pay. Besides I haven't done any personal sanding/finishing since SP days so consider this good practice.

Make sure you get the sandpaper fit for wet sanding. Started with 80 grit. The sanding removed the dull grey coloured corrosion protective coating but frankly I'm not concerned as the brackets are used at a location where there is very little risk of corrosion. Worse case can remove for some light re-finish after every six months or so. Picture below of the fpr bracket after 180 grit.

The higher grit you go the shinier the surface finish. I stopped at 400 grit as I prefer a satin matt look.

Pictures of the brackets installed.

Closer up of the fpr bracket installed.

The results are well worth it  if you ask me. Only cost me like RM30 to get the brackets fabricated. Add sandpaper cost and a couple hours of my own hard labour. I did check on cf equivalents but the cost will be exponentially more. Oh, and all fasteners are lightweight aluminium from Pro-Bolt. For a fraction of the fastener cost, you can use local stainless steel equivalents. Am now thinking if I should replace my oil catch tank mounting bracket or the entire oil catch tank itself. More (brackets) to follow for sure...

Stop Press! With some new fasteners from Pro-Bolt :)

Monday, September 16, 2013

Hellaflush Yo! Part 2

I test fitted one side of the rear as requested by BC Racing NA whom are coming up with a solution. Pictures below of my rear BR vs ER. The ER is already adjusted to max (tallest) height while I believe there is still some room left on the BR.

Measurements revealed the following:
  • My rear BC Racing BRs are currently set at about 645mm which is about 10mm (0.4") lower than stock.
  • The rear ERs at tallest height adjustment will give me a 620mm ride height which is 35mm or ~1.4" lower than stock. 
  • This means that both the front and rear ERs at tallest height adjustment will give a ride height ~35-36mm or 1.4" lower than stock at both ends. 

Picture of the rear right hand side with ER coilover damper and wheel installed. 

From a higher angle. 

More to follow once I hopefully have an update. BC Racing NA have been helpful unlike the vendor where I bought my ERs from.  

Wednesday, September 11, 2013

Hellaflush Yo!

I mentioned that my BC Racing ER coilover dampers were probably too short in a previous post. The response I got from BC Racing was " the height isn't dependent on the spring, as I am sure you are aware of. The Swift spring we utilized, was the proper spring required for a standard ER Sentra requirement". Checking BC Racing Taiwan's website revealed they now have a listing for the Sentra. Front spring length is stated as 160mm and rear 180mm. Joe from 2J Racing emailed me "This is the correct size for the ERs".

So I ate humble pie and installed the ER front coilover with the height adjusted at tallest setting. Can't go any higher as the remote reservoir tube was at the end of it's travel on the lower body.

Pictures below of the Shark with the ERs installed in front only. Installed both sides and took Sharkie for a short drive to be sure.

Only one Andrew Saw finger could go in the gap between the top of the tyre and the bottom of the wheel arch. Sure does look good and fierce though. Now compare this with my BC Racing BRs fitted.

Close to three of Andrew Saw's fingers can fit in the gap. So who's correct in his original assumption now? With the measuring tape I had the following:
  • My front BC Racing BRs are currently set at 645mm (measured from the bottom of the wheel arch to ground) which is bout 19mm or 0.8" lower than stock (664mm per Nissan Sentra B15 USDM Technical Manual)
  • The front ERs at the tallest height adjustment is only 628mm which is 36mm or 1.4" lower than stock
  • And I haven't even fitted the rear ERs yet. Lost my motivation at this point to continue with the install. 

Comparing my front BR with the ER shows that the ER is shorter by quite a bit. Going to taller springs ain't gonna help if the damper body/piston is too short. 

Had to pay close to two hundred ringgit on install labour and alignment job just to prove my assumption is correct. To make matters worse such a low ride height is impractical for daily driving. I doubt I can clear multi-story car parks or even the large speed bumps where I work with more one or more passenger on board (not sure if it'll even clear with only me on board). I haven't even talked about the possible impact to the suspension geometry and handling with regards to roll centre and bumpsteer. You can read up more on why lowering your Slowtra more than 25mm (1") makes it a Super Slowertra @ MotoIQ's excellent article.

The 36mm lower ride height was measured after taking the car for a short drive (a couple km). I would expect a tiny bit of spring sag even with Swift springs which means I might even end up a couple mm lower than 36mm after a couple thousand km. 

I have now paid a lot and more of my hard earned money on shocks I can't daily drive that will worsen the handling unless I spend even more money by buying parts to correct the screwed suspension geometry. On top of this Bro Wallance whom has reserved and paid a deposit for my BR shocks can't collect them as I'm still on the BRs. Really really sorry Bro. Emailing BC NA with the problem resulted in the following response after a week and more than one reminder email "They just told me that they make the ERs lower than the BRs generally and that is due to the design of the reservoir". Mind you none of this was mentioned to me when I ordered my ERs from Joe/2J Racing. I even mentioned the ride height I wanted more than once. I am now hoping and waiting for BC NA, Taiwan, Joe? for a solution soon failing which I will demand a full refund as the mistake is not from my end.