Wednesday, December 31, 2014

Nissan Bluebird Sylphy A-Pillar Garnish

Apparently I bought the last QG10 a-pillar garnish with the spec and colour/trim I wanted in Japan. How do I know so? Well my research originally led me to believe that 76911-4M500 and 76912-4M500 should be what I want. Upon contacting my supplier I was told these are not in stock nor being produced any more. I decided to change my approach and asked which of the 6 part numbers I was given are still in production. After further checking with Nissan Japan, it looks like there is only one set of 76911/2-6N010 left. Yes, only one. With not much of a choice I bit the bullet and placed the order since the cost is not prohibitive (3540 yen each not including shipping). Of the 6 different part numbers, 76911/2-6N010 happens to be the cheapest.

Despite the total cost (a-pillar garnish + shipping) coming in way below the minimum taxable value of MYR 500 our dear customs still decided to hold the shipment and I had to go do the clearance. Picture below of the packaging. 

The part number. 76911 denotes right hand side. 76912 is the other (left hand side).

So, did I get the colour and trim I wanted? The answer is a resounding Yes! Picture below of the LHS a-pillar garnish. Trim colour is "C" according to this link


The inner side of the LHS a-pillar garnish. 

Closer up. The piece of fabric on the lower mounting boss is probably to reduce NVH. 

This means I can now de-ICE Sharkie which will happen soon next year :) 

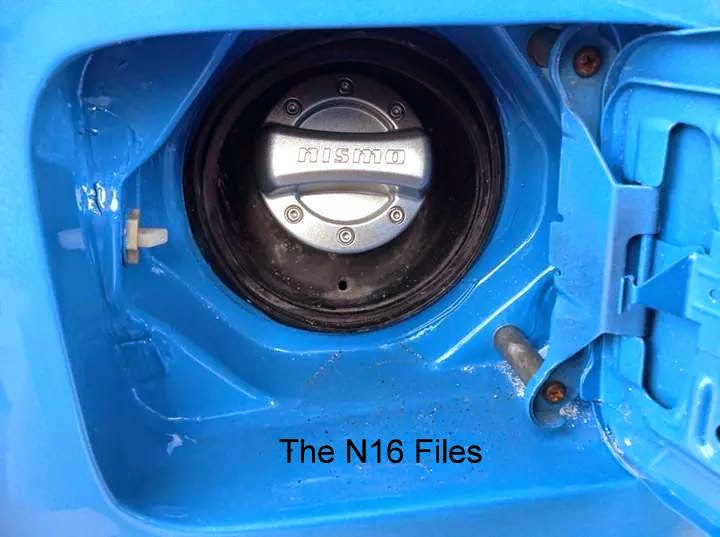
Nismo Fuel Filler Cap Cover Installed

My apologies for the one month hiatus and lack of posts. Been very busy balancing a demanding (real) job, playing with my Fit, new house, house reno and renewal of my hi-fi madness errr hobby. Can't believe we are already on the last day of the year. This year has been one of the fastest in recent memory with things and events just flashing by.

Back to my recent not so successful Nismo fuel filler cap cover project. Jun Wen has just installed the fuel filler cap cover on his S15 and sent me some nice pictures. The fuel filler cap was sold back in October but due to our busy schedules (the man services and works on Paganis ((Yes, the real Pagani Zonda F and Huayra supercar)) all over Asia), I've only recently had time to post this update. I know, I know its a 5 minute install job but taking beauty shots, fondling and licking the Nismo all takes time. Anyway here are the pictures without further blabbering.

From the pictures above, the Silvia S15 fuel filler cap sure looks suspiciously like the one on Sharkie. Wonder if it's the same and if not will it fit the fuel tank filler neck?

Wednesday, November 26, 2014

Automotive Porn - Force Racing Wheels

This is totally unrelated to Slowtras or any N16 variant but is so trick I just had to do a write up. Force Racing hails from the UK and primarily focuses on speed parts for the original Mini. Yes, the original Mini by the one and only Sir Alec Issigonis and not the current BMW Mini.

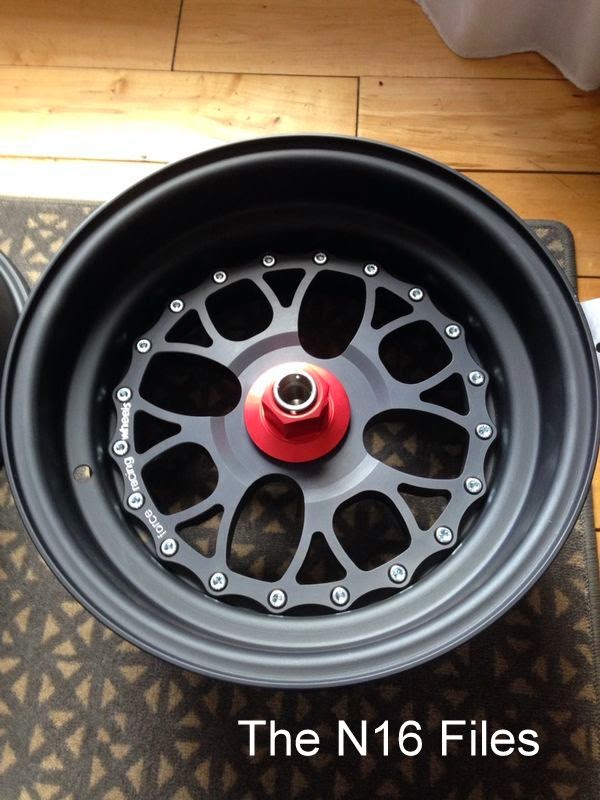
Anyway back to topic of this not on topic posting. Haha! Bro Mugil ordered this 13" x 7" rims/wheels for his Mini. Model is DSY and each rim only weights less than 3.4 kg. Wheels are three piece and is constructed of two outer halves that make up the rim and a centre section. The spokes/centre is bolted to the rim via fasteners. These type of rim allows for the ability to custom tailor wheels for special mostly racing only applications that would not be available otherwise. 

Each rim is CNC machined and anodized. The wheel centres are 6082T6 billet aluminium and are available colour anodised in most colours. 

Reverse/Inner Side.

Close up. All the bolts are titanium btw and separately bought by Mugil. Each rim uses 24 fasteners so for 4 rims you will need 96 sets of titanium bolts and flanged lock nuts.

Wait a minute. Where are the bolt holes for the wheel lugs? Mugil went uber trick here by specifying a centre lock rim like what you see on Super GT/GT race cars. This means each rim/wheel is bolted to the car with only a single centre locking nut. If this is not trick enough, the nuts are titanium alloy. Not only is the material and construction trick, the colour is also Ferrari trick!

The Fantastic Four!

The centre lock kit. Yes, it's Titanium

Test fitted to the rear of  Mugil's Mini. GT racecar rite?
 
Can this (rims) fit your Slowtra? Well, the biggest diameter rim Force Racing makes currently is 15". The other issue is Minis are very light and the lightweight design of the rims means they only support a max of 800kg. Force Racing can make you 40% stronger rims (for cars around 1100-1200 kg) but this means a heavier rim and increased cost. Please do bear in mind the set above without the titanium fasteners and Ti centre lock kit, shipping and tax already costs 1800 GBP (MYR 9450+). If you are still interested, give Force Racing a call. There are no counterfeits or fakes around.

Thursday, October 30, 2014

New Superpro Stuff

Recently surfed Superpro's website on another matter and decided to check their parts listing for the N16 in the hope there might be something new. Truly Incredibly Unbelievably There Is!!!

Superpro has... drum roll! the following new PU bushes for the N16. Most of the new stuff should also fit the USDM B15 and JDM G10. The parts are:
  • Steering Rack Mount Bush (Not sure if this fits Left Hand Drive. Best to check with Superpro or affiliated supplier) - Part Number SPF3560K
  • Scott Russell Link Bush Kit - Part Number SPF4191K
  • Scott Russell Control Rod Bush Kit - Part Number SPF4189K

You can find the complete listing of Superpro parts for N16 @ Superpro's website or here

I will be placing an order for the new stuff soon. In the meantime, if anyone has already installed the new bushes on their car please do report out via the comments section on this blog posting. 

Wednesday, October 22, 2014

New Gearbox Upgrade Project Part 3 - It's Finally in the US!

40 kilos turned out to be less than 15 when Jack got a proper weighing scale to weigh the gearbox internals. This means the shipping cost via Fedex one way is now significantly less than than MYR 1K. Bout RM 644.46 to be exact which means the project is back on-track after a 2 month hiatus. Thanks Bro!

Picture of everything packed up. All hard work, muscle and vocal power (bargaining) and BST from Jack. Only Brothers will do this for you. I only had to type this article and to foot the bill. Jack's spanking high end high tech weighing scale can be seen in the second pic. Sorry Bro, couldn't resist :P

However this is not the end of the story for this post. To ensure I won't get taxed by our dear customs when the gearbox internals are returned, every part had to be individually numbered and declared with proper documentation. And I mean everything including the very smallest washer, clip and o-ring. This unfortunately resulted in the first shipment being returned to Jack as said parts were not declared. Super Major Bummer or should I say in Hokkien "K*nneh!"

So Jack had to re-open up the nice packaging, remove all the parts and then together with Ah Tiong do more dis-assembly and relabeling work. Decision was made to not send all the washers, etc and just the bare bone parts that were to receive the super treatment work. Pictures below showing the fruits of their efforts. Jack said it was more like durian as the whole ordeal proved to be very thorny and prickly.

After all the major BST, what was left was to send the parts hope for the best..

Picture below shows the parts safely arrived @ Greg's place in the US after a week or so. Hurray!

A couple days later I received this email from Greg.

More to follow..

Wednesday, October 8, 2014

Nismo Fuel Filler Cap Cover for Sale - SOLD!

I thought all Nissans within the last 10-20 years should have more or less the same fuel filler cap so this should fit my N16 but boy was I wrong. It's a tad too large.

Which Nissan the fuel filler cap cover fits is in the second picture. If you have difficulty reading, this includes the S15, R32 to R35, Z33 and Z34. Even a lowly K11 March. Just not the N16/G10. Don't ask me why.. :(

The cover adheres to your stock fuel cap via a double sided tape. I got this brand new for 5,500 yen (bout MYR 166.353) per today's exchange rate. Shipping added another 1,200 yen.

I am open to the first offer in the 3 figure ringgit range. This means I am selling a brand new genuine Nismo Fuel Filler Cap Cover for half the price I bought it for. Please do add shipping to where ever destination you are from.

Stop Press! Bro Jun Wen is the lucky new owner of the Nismo Fuel Filler Cap Cover.

Wednesday, September 3, 2014

Third Quarter Progress Review

Remember I had a list of mod jobs at the turn of the year? Well it is now September and below's the current progress:

  • Settle the BC Racing ER coilover damper problem - Still in limbo. 
  • More DIY weight reduction jobs - I seem to be adding weight to Sharkie lately :( 
  • Tidying up the engine bay including possibly some AN plumbing changes for better packaging - Still procrastinating.
  • Proper aero work - Partly done. APR GTC-200 rear wing installed. Front splitter next. 
  • New headlights and rear lights - Can't bring myself to spend a couple grand. Only managed a restoration job for the front headlights. 
  • New seat rails - Done. Bride RO seat rails installed.
  • Revisit the oil catch can setup - Still procrastinating 
  • More carbon and unobtanium parts - Work in progress. Got some parts due to be installed. Stay tuned. 
  • Add more chassis stiffness and rigidity - Zero progress.
  • Add rear arb - Decided on make. Currently in design and manufacturing. Stay tuned.
  • Wider rims and wider tyres - Maybe next year? 
  • Corner weight the car - Ditto
  • Knock detection - Ditto
  • Seat harness - Bought. Stay tuned. 
  • Cylinder head job including new cams - Maybe next year or 2016 :) 
  • Relook into the induction setup. Perhaps a proper airbox? - Ditto 
  • Improve engine bay heat management - Got some ideas and bought some stuff. Other than this, still procrastinating.
  • Paint job (again) - Done. 
  • Install Wilwood brake rotors - Done. 
  • Install WPC oil pump - Still sitting nicely in my cabinet while I procrastinate.

I also added a gearbox upgrade project which is also in limbo due to shipping cost concerns. 

Hope to make up some more progress and lost time as we move towards the end of the year. Please add more positive comments/ideas in this blog or likes in my FB page to get me moving faster.

Tuesday, September 2, 2014

Bride RO Super Seat Rails - Part 2 Installed

Found some free time to install the Bride RO seat rails during the Raya hols. Installation was DIY with help from Tao. Before installing I took the opportunity to weigh the stock mild steel and titanium seat rail fasteners. Stock.

Titanium.

This means a weight saving of 12 grams per set of fastener (bolt + washer). There are 8 sets of fasteners (4 per seat rail) hence the savings are approximately 96 grams.

Uninstalling the Recaros and H Performance seat rails lead to some not so nice surprises. First surprise is the use of these large mild steel washers to level the seats. Four are used per side of a seat/seat rail. If you're wondering what the wire is for, it's for the "fasten your seat belt" warning light which I no longer use :)

If you are still using the stock dash, make sure the wire is connected to this wire which in turn is connected to the seat rail. If you don't the seat belt warning light will be permanently lit.

Decided to weigh the washers for kicks. Total weight savings together with the seat rail bolts are bout 0.23kg.

The washers are required due to the poor manufacturing tolerance of the H Performance seat rails. These actually incorporate genuine Recaro sliders but IMHO that is the only positive aspect of the seat rail. Picture below of the H Performance seat rail after removing the Recaro.

There is no bridge plate in between the sliders for greater structural strength like the Bride RO. Which is not surprising or should I say shocking as what I found out next when disassembling my Recaro from it's seat rail. Each Recaro SR4 utilizes six M6  x 25mm bolts to secure it to it's seat rail (Front uses 4 and rear 2). Only four bolts were used for my case. This was consistent for both seats. Different fastener heads and length were also used instead of one standard type. Some M8 sized spring washers were even used for an M6 bolt I kid you Not! What you can't see can't kill you right? How much does 12 sets of properly sized and load rating mild steel fasteners (bolt and appropriately sized washer) cost? Can't be more than a couple ringgit. Picture below of the crap fasteners used by H Performance.

Picture below of the Bride RO seat rail mated to the SR4 with proper fasteners. And yes, that's my sofa the seat and seat rail is sitting on top of. I did the assembly in my living room mah.

Picture of the anchor bolt used to fasten the seat belt buckle to seat rail

Seat belt buckle installed onto the seat rail.

Picture below shows the Bride RO vs H Performance seat rail.

The Bride ROs weigh 5 kg each while the H Performance seat rail is 4kg which unfortunately means 0.75 kg of flab is added to Sharkie. If you value your own personal safety this is a compromise I am more than happy to accept. Picture of the new seat rail and seat mounted back on Sharkie. 

Seat height with the Bride RO is approximately 20mm lower than the H Performance seat rail which is perfect for me as I'm not your average height Malaysian. Rail sliding action is very positive. Seat belt buckle no longer does the disappearing act. 

Overall I am very satisfied and impressed with the quality of the Bride ROs. My only regret is I should have gone with these seat rails when I got the Recaros two years back.

Monday, August 11, 2014

Bride RO Super Seat Rails - Part 1

The quality of the local made H Performance seat rails for the Recaro SR4s leaves a lot to be desired. Apart from the crappy weld quality and stiff sliding action of the slider rail, the seat belt buckles would occasionally "disappear" rotating backward and downward away from sight. This would often invite the occasional heavy metal music especially if the front passenger is my dear wifey.

Original Recaro Germany seat rails cost a bomb (2K upwards for a pair of seat rails) so I researched for lower cost but similar quality alternatives. Short of repeating myself to death, one knows that aftermarket seat rails for the Slowtra are not exactly in abundance and that such research typically ends up in a dead end. However for once the Gods of Car Mods were smiling on me and the research led me to conclude that a N16/B15/G10 uses the same seat rails as a JDM B15 Sunny and when it comes to Jap cars, Bride is the most popular and well known brand for seats and seat rails. And Bride does have a seat rail application for the B15. Part number of the Bride seat rail for JDM B15 Sunny.

As can be seen above, Bride has multiple seat rail models but these are meant for their varied range of seats or side (vs bottom mount) for full bucket single piece competition seats. Only the RO and MO models fit my Recaro SR4. I decided to bite the bullet and order the RO as this can later be upgraded to MO type by buying and installing the optional MO adapter plates on the RO seat rail. I was initially going to order from RHD Japan but pondered and procrastinated on this for ages. More than a year in fact as I was very concerned about the taxation costs. In the end Bro Eu Jin came to my rescue and sourced the RO seat rails for me. Bro Eu Jin is the boss of JDM Auto Link and he can get any JDM part you want so look the man up!

Price of a pair of seat rails came up to more than 1.5K MYR direct to your doorstep. Price will differ according to the exchange rate of the Japanese Yen vs Malaysian Ringgit so best to check with Eu Jin. Lead time between placement of order and deposit and arrival at one's doorstep is between 1 to 3 months depending on the shipment schedule between Japan to Bolehland. If you want fast you can always order from RHD Japan and airfreight to your house but good luck in between. Picture of the shipping packaging.

Part number and application. Looks like the Y11 Wingroad also use the same seat rail.

The seat rail. Also included is a detailed and idiot proof installation "manual" complete with drawings. No knowledge of Japanese is required to know what goes or fits where. Also included is a Bride seat rail specific anchor bolt for the seat belt buckle. Only one anchor bolt is supplied per seat rail so don't lose it.

One of several identification labels.

Be careful of fakes when it comes to Bride seats or seat rails. I have seen many. A seat and it's seat rail is a major critical safety component of any car so you decide if you wanna mess around with that. Original Bride seat rails uses slider rails sourced from Faurecia in France. Faurecia oems for PSA (Peugeot and Citroen), Nissan, GM and Volkswagen so they definitely know what they are doing. The upper rail metal thickness is 2mm while the lower rail is 2.3mm. Beefy!

I also decided to replace all the seat rail fasteners with titanium equivalents. You will need six M6 X 25mm bolts to secure each SR type seat to its seat rail meaning 12 total unless you only have one seat. Likewise four M10 X 30mm bolt secures each seat + seat rail to the car (8 total). Don't forget the washers.

Took me forever to find a M10 X 25mm diameter washer for the bolt securing seat rail to car. Standard diameter for a M10 titanium washer is 20mm. 20mm diameter might have insufficient surface clamp area as the bolt hole on the seat rail is way larger than 10mm to allow for some adjustment. In the end the closest I could find is a 30mm diameter washer from Allied Titanium in the US.

Stay tuned for Part 2 where I install the seat rails.

Saturday, August 2, 2014

Panasonic Maintenance Free Car Batteries

When one thinks of Panasonic, electronic/electrical home appliances comes to mind and not car batteries. Well Pana makes not one but two different grades of maintenance free car batteries for N16s and most other popular cars sold in Bolehland. In fact, the Panasonic is the recommended oem replacement battery for MYDM Hondas.

I first used the Standard Grade Pana in 2012 while Slowtra was being transformed into Sharkie. It has a white casing and black top. Picture below on Sharkie sometime in 2013. Just look at the size of the battery in comparison with the K&N air filter.

IMHO the battery size is the worse design on a N16 apart from the wheelbarrow rear suspension. Like most Jap cars, Nissan decided to put such a heavy component on the front corner mostly for convenience as having the batt in the boot/trunk takes up free space. Unfortunately, while most C segment cars of the same period use a NS60 sized batt, Nissan decided on a bigger and heavier NS70. So much for mass centralization and better weight distribution for better handling. Family oriented sedan mah! Picture below of a smaller Pana batt in my wife's Civic. Older gen Civics have the batt next to the firewall which is even better.

Weight below of the Pana Std Spec maintenance free battery. You didn't see wrong. That's 17 kilos (not pounds) of flab in a place where you would least want it to be :(

I recently decided to replace the Std Spec Pana I was using with a High Spec model. The whole batt is black in colour to differentiate it from the standard spec. Panasonic uses Silver Alloy technology to strengthen the battery against high temperature which is a plus as Sharkie's engine bay is way hotter than any regular N16. The reserve capacity of the High Spec is also longer @ 75Ah vs 65 Ah for the Standard Spec. Having said this the Standard Spec Pana lasted me a good two years or so and had not yet failed when I replaced it. Picture below of the High Spec in its packaging.

I did weight the High Spec but was totally demotivated to take a pix at this point as it weighs 1kg more than the Standard Spec (~18kg). Super Sigh!!! :( Cost is also more than the Std Spec @ MYR 350 for the High Spec vs 260 for the Std Spec. Picture below of the High Spec installed.

My long term upgrade plan is to relocated the batt to the boot and/or try a dry cell Lithium Ion Phosphate battery. The only problems are finding a suitable CE to undertake this (relocation) work and the massive cost of a lithium ion batt. RM3 to 6K+ anyone?